No products in the cart.

19 Delectable Pillsbury Biscuit Recipes: One Dough, Endless Possibilities
With just one convenient dough, Pillsbury biscuits create endless meal possibilities that wow at any table. Imagine whipping up a classic breakfast sandwich, cheesy garlic knots, or a comforting chicken pot pie—all in no time! You can mix ingredients to fit your taste, whether you’re a meat lover or prefer veggie delights. Want something sweet? Try biscuit chocolate chip cookies or monkey bread! These recipes are easy and perfect for any occasion, from brunch to dinner parties. So, why not get creative and explore how this versatile dough can elevate your meals to mouthwatering heights? There’s so much more to discover!
Contents
hide
Classic Biscuit Breakfast Sandwich

Title: Classic Biscuit Breakfast Sandwich
Prep Time: 10 minutes
Cook Time: 20 minutes
Number of Servings: 4
Required Equipment List: Oven, baking sheet, skillet, spatula, knife
Cuisine Type: American
The Classic Biscuit Breakfast Sandwich is a hearty and satisfying way to start your day. With its flaky, buttery biscuit enveloping a delicious combination of breakfast staples, this sandwich is sure to please everyone at the breakfast table. The warm biscuits are the perfect base for savory fillings like crispy bacon or sausage, fluffy scrambled eggs, and gooey cheese, creating a delightful blend of textures and flavors that will keep you coming back for more.
This recipe isn’t only simple to prepare but also easily customizable. You can substitute the proteins or add your favorite vegetables to make it your own. Whether you enjoy a classic bacon, egg, and cheese combo or prefer a vegetarian option with avocado and spinach, these biscuits provide the perfect canvas for your culinary creativity. Serve them warm for a comforting breakfast or brunch that’s sure to impress family and friends.
Ingredients:
- 1 can (16.3 ounces) refrigerated Pillsbury Grands! Biscuits
- 8 large eggs
- 1/4 cup milk
- 8 slices bacon or breakfast sausage patties
- 1 cup shredded cheddar cheese
- Salt and pepper to taste
- Butter (for greasing the skillet)
- Optional: hot sauce or fresh herbs for garnish
Instructions:
- Preheat your oven to 350°F (175°C). Line a baking sheet with parchment paper and arrange the biscuits on it. Bake according to package instructions, typically about 15-20 minutes, until golden brown.
- While the biscuits are baking, cook the bacon or sausage in a skillet over medium heat until crispy. Remove from the skillet and set aside on a paper towel to drain excess grease.
- In a mixing bowl, whisk together the eggs, milk, salt, and pepper until well combined. In the same skillet, add a small amount of butter and pour in the egg mixture. Cook over medium-low heat, stirring gently until the eggs are scrambled and cooked through, about 5 minutes.
- Once the biscuits are done baking, remove them from the oven and let them cool slightly. Carefully slice each biscuit in half horizontally.
- To assemble the sandwiches, place a portion of scrambled eggs on the bottom half of each biscuit. Add a slice of bacon or a sausage patty, followed by a sprinkle of shredded cheddar cheese. Top with the other half of the biscuit and serve warm.
Extra Tips: For added flavor, consider seasoning your scrambled eggs with herbs such as chives or parsley. You can also toast the biscuit halves in the skillet for a minute or two after assembling for an extra crunchy texture. If you prefer a spicy kick, drizzle some hot sauce on the eggs or add sliced jalapeños before closing the sandwich. Enjoy this breakfast classic any time of the day!
Cheesy Biscuit Garlic Knots

Title: Cheesy Biscuit Garlic Knots
Prep Time: 10 minutes
Cook Time: 15 minutes
Number of Servings: 8
Required Equipment List: Baking sheet, mixing bowl, oven, pastry brush
Cuisine Type: American
Cheesy Biscuit Garlic Knots are a delightful and easy-to-make appetizer that combines the buttery flakiness of biscuits with the rich flavor of garlic and cheese. Perfect for parties, game days, or a cozy family dinner, these savory knots are sure to be a crowd-pleaser.
The combination of melted cheese and aromatic garlic butter creates a mouthwatering aroma that wafts through your kitchen, making it hard to resist grabbing one right out of the oven. Using pre-made biscuit dough saves time while still delivering a homemade feel.
These knots are incredibly versatile, allowing you to add your favorite herbs or spices to customize the flavor. Whether served with marinara sauce for dipping or enjoyed on their own, Cheesy Biscuit Garlic Knots are a delicious and fun addition to any meal or gathering.
Ingredients:
- 1 can (8 count) Pillsbury refrigerated biscuit dough
- 1 cup shredded mozzarella cheese
- 4 tablespoons butter, melted
- 3 cloves garlic, minced
- 1 teaspoon dried Italian seasoning
- 1/2 teaspoon salt
- 1/4 teaspoon black pepper
- Fresh parsley, chopped (for garnish, optional)
Instructions:
- Preheat your oven to 375°F (190°C) and line a baking sheet with parchment paper to prevent sticking. Prepare your workspace by gathering all the necessary ingredients and equipment for easy access.
- Open the biscuit dough and separate the individual biscuits. Flatten each biscuit slightly with your hands or a rolling pin, creating a small circle. Place a tablespoon of shredded mozzarella cheese in the center of each biscuit.
- Fold the edges of the biscuit dough over the cheese to create a pouch. Pinch the edges to seal the cheese inside, then roll the stuffed biscuit into a knot shape by twisting the dough together and tucking the ends underneath.
- In a mixing bowl, combine the melted butter, minced garlic, Italian seasoning, salt, and black pepper. Brush a generous amount of the garlic butter mixture over each knot, ensuring they’re well-coated for maximum flavor.
- Arrange the garlic knots on the prepared baking sheet, spacing them out evenly. Bake in the preheated oven for 12-15 minutes or until they’re golden brown and cooked through.
- Once baked, remove the knots from the oven and brush them with any remaining garlic butter mixture. Garnish with chopped fresh parsley, if desired, before serving them warm.
Extra Tips: For an extra kick of flavor, consider adding red pepper flakes to the garlic butter mixture. If you want to experiment, try mixing different types of cheese, such as cheddar or parmesan, for a unique twist.
These knots are best enjoyed fresh out of the oven, but they can be stored in an airtight container for a day or two. Reheat them in the oven for a few minutes to restore their original texture. Enjoy your cheesy, garlicky creation!
Biscuit Chicken Pot Pie

Title: Biscuit Chicken Pot Pie
Prep Time: 20 minutes
Cook Time: 30 minutes
Number of Servings: 6
Required Equipment List: Large skillet, mixing bowl, baking dish, oven, spoon
Cuisine Type: American
Biscuit Chicken Pot Pie is a comforting and hearty dish that combines tender chicken and vegetables in a creamy sauce, all topped with fluffy biscuits. This recipe is perfect for a family dinner or a cozy night in, bringing warmth and flavor to your table.
The use of Pillsbury biscuits not only saves time but also provides a deliciously soft and buttery crust that pairs perfectly with the rich filling underneath. The creamy filling is made with rotisserie chicken, mixed vegetables, and a savory sauce that brings all the flavors together.
Once baked, the biscuits rise beautifully, creating a golden-brown topping that contrasts perfectly with the rich filling. This dish isn’t only satisfying but also easily customizable; you can add your favorite vegetables or herbs to make it your own.
Ingredients:
- 1 pound cooked rotisserie chicken, shredded
- 1 cup frozen mixed vegetables (peas, carrots, corn)
- 1/2 cup chopped onion
- 1/2 cup celery, chopped
- 1/3 cup butter
- 1/3 cup all-purpose flour
- 1 3/4 cups chicken broth
- 1 cup milk
- 1 teaspoon garlic powder
- 1 teaspoon onion powder
- Salt and pepper to taste
- 1 can Pillsbury biscuits (8 count)
Instructions:
- Preheat your oven to 375°F (190°C). In a large skillet over medium heat, melt the butter and add the chopped onion and celery. Sauté for about 3-4 minutes until softened and fragrant.
- Stir in the flour, garlic powder, onion powder, salt, and pepper, mixing well to create a roux. Gradually add the chicken broth and milk, stirring constantly until the mixture thickens and is bubbly, about 5-7 minutes.
- Add the shredded chicken and frozen mixed vegetables to the skillet, stirring to combine everything evenly. Allow the filling to cook for an additional 2-3 minutes, then remove it from heat.
- Pour the chicken and vegetable mixture into a baking dish, spreading it out evenly. Open the can of Pillsbury biscuits and arrange them on top of the filling, leaving some space in between each biscuit.
- Bake in the preheated oven for 25-30 minutes or until the biscuits are golden brown and cooked through. If the biscuits brown too quickly, you can cover the dish loosely with aluminum foil.
- Once baked, remove the pot pie from the oven and let it cool for a few minutes before serving. This will help the filling set slightly, making it easier to serve.
Extra Tips: To enhance the flavor of the filling, consider adding your choice of herbs such as thyme or rosemary. For a little extra creaminess, you can mix in some cream cheese or sour cream with the chicken broth and milk.
If you’re looking for a shortcut, using frozen cooked chicken can also save time. Serve this pot pie with a simple green salad for a complete meal that’s sure to please everyone at the table!
Sweet Cinnamon Roll Biscuits

Title: Sweet Cinnamon Roll Biscuits
Prep Time: 15 minutes
Cook Time: 15 minutes
Number of Servings: 8
Required Equipment List: Baking sheet, parchment paper, mixing bowl, whisk, rolling pin
Cuisine Type: American
These Sweet Cinnamon Roll Biscuits are a delightful fusion of traditional cinnamon rolls and fluffy biscuits, making them the perfect treat for breakfast or brunch. With their tender texture and sweet cinnamon flavor, they’re sure to please everyone at the table.
The addition of a creamy glaze on top adds a touch of indulgence, turning these biscuits into a delightful dessert as well. What makes these biscuits stand out is their simplicity; using pre-made biscuit dough means you can whip up a batch in no time at all.
Each bite is bursting with the warm flavors of cinnamon and sugar, making them a comforting option for any occasion. These biscuits are best enjoyed warm, straight from the oven, but they can also be stored and reheated for a quick treat later.
Ingredients:
- 1 can Pillsbury Grands! refrigerated biscuit dough
- 1/4 cup granulated sugar
- 1 tablespoon ground cinnamon
- 1/4 cup unsalted butter, melted
- 1 cup powdered sugar
- 2 tablespoons milk
- 1/2 teaspoon vanilla extract
Instructions:
- Preheat the oven to 350°F (175°C) and line a baking sheet with parchment paper. This will guarantee that the biscuits don’t stick and make for easy cleanup.
- In a small bowl, mix the granulated sugar and ground cinnamon together until well combined. This cinnamon-sugar mixture will be used to create the filling for the biscuits.
- Open the can of biscuit dough and separate the biscuits. Using a rolling pin, flatten each biscuit into a circle about 1/4 inch thick. Brush the melted butter over the surface of each flattened biscuit.
- Sprinkle a generous amount of the cinnamon-sugar mixture over each biscuit, then roll them up tightly from one side to the other, forming a log. Pinch the ends to seal and place them seam-side down on the prepared baking sheet.
- Bake the biscuits in the preheated oven for 12-15 minutes, or until they’re golden brown and cooked through. Keep an eye on them, as baking times may vary depending on your oven.
- While the biscuits are baking, prepare the glaze by whisking together the powdered sugar, milk, and vanilla extract in a small bowl until smooth. Adjust the consistency by adding more milk if needed.
- Once the biscuits are done baking, remove them from the oven and let them cool for a few minutes. Drizzle the glaze generously over the warm biscuits before serving.
Extra Tips: For an extra touch of flavor, consider adding chopped nuts or raisins to the cinnamon-sugar mixture. You can also experiment with different extracts, such as almond or maple, in the glaze for a unique twist.
These biscuits are best enjoyed fresh, but you can store any leftovers in an airtight container for a couple of days. Gently reheat them in the microwave for a few seconds to bring back their warmth!
Biscuit Taco Cups

Title: Biscuit Taco Cups
Prep Time: 15 minutes
Cook Time: 20 minutes
Number of Servings: 12
Required Equipment List: Muffin tin, mixing bowl, spoon, oven
Cuisine Type: Tex-Mex
Biscuit Taco Cups are a fun and creative way to enjoy tacos without the mess of traditional taco shells. This recipe combines the flaky goodness of Pillsbury biscuits with a savory filling of seasoned ground meat, cheese, and your favorite taco toppings. Perfect for a casual family dinner or as a party appetizer, these bite-sized taco cups are sure to be a hit with both kids and adults alike.
The versatility of this dish allows you to customize the fillings according to your taste preferences. Whether you choose beef, turkey, or even a vegetarian option with beans and vegetables, the biscuit cups provide a soft and delicious base that holds everything in place. Serve them with a side of salsa, guacamole, or sour cream for dipping, and you’ll have a delightful meal that brings a twist to taco night.
Ingredients:
- 1 can (16.3 oz) Pillsbury refrigerated flaky biscuits
- 1 pound ground beef or turkey
- 1 packet taco seasoning
- 1 cup shredded cheddar cheese
- 1/2 cup diced tomatoes
- 1/4 cup sliced black olives (optional)
- 1/4 cup chopped green onions
- Sour cream, salsa, or guacamole for serving
Instructions:
- Preheat your oven to 375°F (190°C). Grease a muffin tin with non-stick spray to guarantee the biscuit cups can be easily removed after baking.
- In a skillet over medium heat, cook the ground beef or turkey until browned, breaking it apart with a spoon. Drain any excess grease, then stir in the taco seasoning according to package instructions, adding a splash of water if needed. Cook for an additional 2-3 minutes until well combined and heated through.
- Open the can of biscuits and separate them. Flatten each biscuit into a round shape, then press them into the bottom and up the sides of the muffin tin cups to form a shell.
- Spoon the seasoned meat mixture evenly into each biscuit cup, filling them generously but not overflowing. Top each filled cup with shredded cheddar cheese, allowing it to melt and create a delicious topping.
- Bake in the preheated oven for 12-15 minutes or until the biscuit cups are golden brown and the cheese is melted and bubbly. Remove from the oven and let them cool for a few minutes before carefully removing them from the muffin tin.
- Garnish the taco cups with diced tomatoes, black olives, and green onions. Serve warm with your choice of sour cream, salsa, or guacamole on the side for dipping.
Extra Tips: For a fun twist, try adding different toppings like jalapeños, avocado, or corn to the filling. You can also experiment with different types of cheese, such as pepper jack for a spicy kick.
If you prefer a vegetarian option, substitute the meat with black beans and corn, and add extra veggies for flavor. These taco cups can be made ahead of time and reheated, making them perfect for meal prep or gatherings!
Strawberry Biscuit Shortcake

Title: Strawberry Biscuit Shortcake
Prep Time: 15 minutes
Cook Time: 15 minutes
Number of Servings: 6
Required Equipment List: Baking sheet, mixing bowl, whisk, knife, serving dishes
Cuisine Type: American
Strawberry Biscuit Shortcake is a delightful dessert that combines the sweetness of fresh strawberries with buttery, flaky biscuits. This recipe capitalizes on the natural flavors of ripe strawberries, which are macerated with a bit of sugar to enhance their juiciness.
The biscuits are quick to prepare, using Pillsbury dough to save time while still delivering a homemade taste that’s perfect for summer gatherings or family celebrations.
The beauty of this dish lies in its simplicity. The warm, soft biscuits serve as the perfect base for the strawberries, and a generous dollop of whipped cream on top adds a luscious finish. This dessert not only looks impressive but is also easy to assemble, making it a favorite for both novice and experienced bakers.
Serve it at your next barbecue or picnic for a revitalizing and satisfying treat that everyone will love.
Ingredients:
- 1 can Pillsbury refrigerated biscuits
- 2 cups fresh strawberries, hulled and sliced
- 2 tablespoons granulated sugar
- 1 cup heavy whipping cream
- 2 tablespoons powdered sugar
- 1 teaspoon vanilla extract
Instructions:
- Preheat your oven to 350°F (175°C). Open the can of Pillsbury biscuits and place them on a baking sheet lined with parchment paper, ensuring they’re spaced evenly apart for even baking.
- Bake the biscuits in the preheated oven for about 10-12 minutes or until golden brown. While the biscuits are baking, prepare the strawberries by placing them in a mixing bowl and sprinkling them with granulated sugar. Toss to combine, and let them sit for about 10 minutes to release their juices.
- While the strawberries macerate, whip the heavy cream in a mixing bowl using a whisk or an electric mixer until soft peaks form. Add the powdered sugar and vanilla extract, and continue whipping until the cream reaches a fluffy consistency.
- Once the biscuits are baked, remove them from the oven and let them cool slightly. Slice each biscuit in half horizontally to create a top and bottom layer.
- To assemble, place the bottom half of each biscuit on a serving dish, spoon a generous amount of the macerated strawberries on top, followed by a dollop of whipped cream. Finish with the top half of the biscuit and add a little more whipped cream and strawberries on top if desired.
Extra Tips: For an extra touch, consider adding a splash of balsamic vinegar to the strawberries while they macerate for a hint of complexity. You can also substitute the heavy cream with whipped topping for a lighter option.
If you have leftover biscuit dough, you can form smaller biscuits or use cookie cutters to make fun shapes for a whimsical presentation. Enjoy your Strawberry Biscuit Shortcake as a delightful ending to any meal!
Biscuit Pizza Bites

Title: Biscuit Pizza Bites
Prep Time: 10 minutes
Cook Time: 15 minutes
Number of Servings: 8
Required Equipment List: Baking sheet, parchment paper, oven, mixing bowl, spoon
Cuisine Type: American
Biscuit Pizza Bites are a fun and delicious way to enjoy the classic flavors of pizza in a bite-sized form. Perfect as a quick appetizer or snack, these little morsels use refrigerated biscuit dough as a base, making them easy to prepare and bake.
With a variety of toppings, you can customize these bites to suit any taste, whether you prefer classic pepperoni and cheese or a veggie-packed option. These pizza bites aren’t only simple to make but also a hit with both kids and adults alike.
They’re great for parties, game days, or just a cozy night in front of the TV. With just a few ingredients and minimal prep time, you can whip up a batch of these delightful treats that are sure to satisfy your pizza cravings.
Ingredients:
- 1 can refrigerated biscuit dough
- 1 cup pizza sauce
- 1 cup shredded mozzarella cheese
- 1/2 cup pepperoni slices
- 1/4 cup chopped bell peppers (optional)
- 1/4 cup sliced olives (optional)
- Italian seasoning (optional)
Instructions:
- Preheat your oven to 375°F (190°C) and line a baking sheet with parchment paper to prevent sticking. This will also make for an easy cleanup after baking.
- Open the can of refrigerated biscuit dough and separate the biscuits. Flatten each biscuit with your hands or a rolling pin to form a small disc, about 1/4 inch thick.
- Place the flattened biscuits onto the prepared baking sheet, leaving a little space between each one. This will allow them to puff up nicely as they bake.
- Spoon a small amount of pizza sauce onto each biscuit, spreading it out evenly but leaving some space around the edges. This prevents overflow during baking.
- Top each biscuit with a generous sprinkle of shredded mozzarella cheese, followed by your choice of toppings such as pepperoni, bell peppers, and olives. If desired, sprinkle a little Italian seasoning on top for added flavor.
- Bake the pizza bites in the preheated oven for 12-15 minutes, or until the biscuits are golden brown and the cheese is melted and bubbly.
- Once baked, remove the pizza bites from the oven and let them cool for a minute before serving. Enjoy them warm with extra pizza sauce for dipping, if desired.
Extra Tips: For an added twist, consider mixing some garlic powder into the biscuit dough before flattening or brushing the tops with melted butter for a golden finish.
You can easily tailor these bites to your liking by using different sauces or cheeses. Experiment with various toppings such as cooked sausage, fresh basil, or even jalapeños for a spicy kick.
These Biscuit Pizza Bites are best enjoyed fresh, but they can be stored in an airtight container in the refrigerator for a few days and reheated in the oven to regain their crispiness. Enjoy!
Savory Biscuit Casserole

Title: Savory Biscuit Casserole
Prep Time: 15 minutes
Cook Time: 30 minutes
Number of Servings: 6
Required Equipment List: 9×13 inch baking dish, mixing bowl, spoon, oven
Cuisine Type: American
This Savory Biscuit Casserole is a comforting dish that combines flaky biscuit dough with a hearty filling of eggs, cheese, and your choice of meats or vegetables. It’s the perfect solution for a cozy family breakfast or brunch, featuring layers of flavors that meld beautifully as they bake.
The biscuits rise and create a delightful crust over the savory filling, making it both filling and satisfying. The beauty of this casserole lies in its versatility. You can easily customize it by adding your favorite ingredients such as cooked sausage, bacon, or even sautéed vegetables for a vegetarian option.
It’s a great way to use up leftovers and can be prepared ahead of time for a hassle-free meal. Once baked, this casserole is sure to be a favorite at your table, bringing warmth and joy to any gathering.
Ingredients:
- 1 can (16.3 oz) Pillsbury refrigerated flaky biscuits
- 6 large eggs
- 1 cup milk
- 1 cup shredded cheddar cheese
- 1 cup cooked sausage or ham, chopped (optional)
- 1/2 teaspoon salt
- 1/4 teaspoon black pepper
- 1/2 teaspoon garlic powder
- 1/2 teaspoon onion powder
- Chopped green onions (for garnish, optional)
Instructions:
- Preheat your oven to 350°F (175°C) and grease a 9×13 inch baking dish. This will guarantee that your casserole doesn’t stick and makes for easy serving.
- In a mixing bowl, whisk together the eggs, milk, salt, pepper, garlic powder, and onion powder until well combined. This mixture will form the creamy base of your casserole.
- Open the can of biscuits and cut each biscuit into quarters. Place the biscuit pieces evenly in the greased baking dish, creating a base layer for the casserole.
- Pour the egg mixture over the biscuit pieces, making sure to cover them evenly. This will allow the biscuits to absorb the flavors as they bake.
- Sprinkle the shredded cheddar cheese and the cooked sausage or ham evenly over the top of the egg mixture. If you’re adding vegetables, you can layer them in at this point as well.
- Bake the casserole in the preheated oven for 25-30 minutes, or until the egg is set and the biscuits are golden brown and puffed up. You can insert a toothpick in the center to check if it comes out clean.
- Once baked, remove the casserole from the oven and let it cool for a few minutes before serving. Garnish with chopped green onions if desired.
Extra Tips: For a spicier kick, consider adding diced jalapeños or a dash of hot sauce to the egg mixture. You can also substitute different types of cheese, such as pepper jack or mozzarella, to switch up the flavor.
This casserole can be made ahead of time and stored in the refrigerator; just reheat in the oven before serving for a quick breakfast option. Enjoy your savory creation!
Biscuit and Gravy Skillet

Title: Biscuit and Gravy Skillet
Prep Time: 15 minutes
Cook Time: 30 minutes
Number of Servings: 6
Required Equipment List: Skillet, measuring cups, measuring spoons, spatula
Cuisine Type: American
Biscuit and Gravy Skillet is a hearty and comforting dish that combines fluffy biscuits with rich and savory sausage gravy, all in one pan. This recipe is perfect for a weekend brunch or a cozy breakfast-for-dinner option. The buttery biscuits soak up the creamy gravy, creating a delicious balance of flavors and textures that will satisfy even the heartiest of appetites.
This dish isn’t only delicious but also incredibly easy to make. Using Pillsbury biscuits saves time without compromising on taste, allowing you to whip up this comforting meal in just a fraction of the time it would take to make everything from scratch. Serve it with a side of fresh fruit or a light salad for a well-rounded meal that everyone will love.
Ingredients:
- 1 can Pillsbury refrigerated biscuits
- 1 pound breakfast sausage
- 1/4 cup all-purpose flour
- 2 cups milk
- 1/2 teaspoon garlic powder
- 1/2 teaspoon onion powder
- Salt and pepper to taste
- Chopped parsley for garnish (optional)
Instructions:
- Start by preheating your oven according to the instructions on the biscuit package. This will guarantee that the biscuits are perfectly baked while you prepare the gravy.
- In a large skillet over medium heat, cook the breakfast sausage until browned and fully cooked, breaking it up into small pieces with a spatula as it cooks. This should take about 5-7 minutes.
- Once the sausage is cooked, sprinkle the flour over the sausage and stir to combine. Cook for an additional 1-2 minutes to allow the flour to absorb the grease and create a thick base for the gravy.
- Gradually pour in the milk, stirring constantly to avoid lumps. Add the garlic powder, onion powder, salt, and pepper. Continue to cook the mixture, stirring frequently, until it thickens to your desired consistency, about 5-7 minutes.
- While the gravy is thickening, place the biscuits on a baking sheet and bake them according to the package instructions until golden brown.
- Once the biscuits are done baking, remove them from the oven and cut them in half. Arrange the biscuit halves on a plate and ladle the sausage gravy generously over the top. Garnish with chopped parsley if desired, and serve immediately.
Extra Tips: For an extra kick of flavor, consider adding a pinch of cayenne pepper to the gravy while it thickens. If you prefer a creamier gravy, you can substitute half of the milk with heavy cream.
This dish is best enjoyed fresh, but leftovers can be stored in an airtight container in the refrigerator for a day or two. Reheat gently on the stove or in the microwave, adding a splash of milk to loosen the gravy if necessary. Enjoy your delicious Biscuit and Gravy Skillet!
Biscuit Fruit Galette

Title: Biscuit Fruit Galette
Prep Time: 20 minutes
Cook Time: 25 minutes
Number of Servings: 6
Required Equipment List: Baking sheet, parchment paper, rolling pin, mixing bowl, knife
Cuisine Type: American
This Biscuit Fruit Galette is a delightful and rustic dessert that perfectly balances flaky biscuit dough with a sweet, juicy fruit filling. It’s an excellent way to showcase seasonal fruits, whether you’re using fresh berries, peaches, or apples. The biscuits provide a tender and buttery base that cradles the fruit while offering a satisfying crunch on the outside.
This galette isn’t only delicious but also incredibly easy to make, allowing even novice bakers to impress friends and family with a stunning dessert. What makes this recipe truly special is its versatility; you can use whatever fruit is in season or whatever you have on hand.
The galette can be served warm with a scoop of vanilla ice cream or at room temperature for a delightful afternoon treat. The combination of the sweet fruit filling and the rich biscuit crust makes this dessert a crowd-pleaser for any occasion, from summer picnics to holiday gatherings.
Ingredients:
- 2 cans (16.3 oz each) refrigerated biscuit dough
- 2 cups mixed fresh fruit (berries, peaches, or apples)
- 1/4 cup granulated sugar
- 1 tablespoon cornstarch
- 1 teaspoon vanilla extract
- 1 tablespoon lemon juice
- 1 egg (for egg wash)
- 1 tablespoon milk (for egg wash)
- 1 tablespoon butter (for dotting)
Instructions:
- Preheat your oven to 375°F (190°C) and line a baking sheet with parchment paper. This will help prevent sticking and make for easy cleanup after baking.
- In a mixing bowl, combine the fresh fruit, granulated sugar, cornstarch, vanilla extract, and lemon juice. Toss gently to coat the fruit evenly and set aside to let the juices meld while you prepare the biscuit dough.
- Open the cans of biscuit dough and separate the biscuits. Using a rolling pin, flatten each biscuit into a larger circle, about 5-6 inches in diameter. Aim for uniform thickness to guarantee even baking.
- Place the flattened biscuits onto the prepared baking sheet, leaving space between each. Spoon about 1-2 tablespoons of the fruit mixture in the center of each biscuit, making sure to leave about an inch of border around the edges.
- Fold the edges of the biscuit dough over the fruit filling, pinching to secure and forming a rustic galette shape. Brush the edges with a mixture of beaten egg and milk for a golden finish, and dot the top of the fruit with small pieces of butter.
- Bake in the preheated oven for 20-25 minutes or until the biscuit edges are golden brown and the fruit is bubbly. Remove from the oven and allow to cool slightly before serving.
Extra Tips: For an added touch of flavor, try sprinkling a little cinnamon or nutmeg on the fruit filling before baking. If you’d like a sweeter crust, you can sprinkle sugar on the edges of the galette before baking.
This dessert is best enjoyed fresh, but leftovers can be stored in an airtight container at room temperature for a day or two. Serve with whipped cream or a scoop of ice cream for a delectable finish!
Loaded Biscuit Bites

Title: Loaded Biscuit Bites
Prep Time: 15 minutes
Cook Time: 12 minutes
Number of Servings: 8
Required Equipment List: Baking sheet, mixing bowl, knife, measuring cups, measuring spoons
Cuisine Type: American
Loaded Biscuit Bites are a fun and flavorful appetizer that combines the fluffy goodness of Pillsbury biscuits with a variety of savory toppings. Perfect for parties, game days, or as a tasty snack, these bite-sized delights are sure to please any crowd.
The biscuits serve as a delicious base, while the loaded toppings, which can include cheese, meats, and veggies, create a mouthwatering explosion of flavors in every bite. This recipe is incredibly versatile, allowing you to customize the toppings based on your preferences or what you have on hand.
Whether you’re a fan of classic combinations like cheese and bacon or want to try something more adventurous with jalapeños and creamy ranch, these Loaded Biscuit Bites are easy to make and always a hit. Get ready to impress your guests with this delightful treat that’s simple enough for even the most novice of cooks!
Ingredients:
- 1 can Pillsbury refrigerated biscuits
- 1 cup shredded cheddar cheese
- 1/2 cup cooked bacon, crumbled
- 1/2 cup diced green onions
- 1/4 cup sour cream
- 1/4 cup ranch dressing
- Salt and pepper to taste
Instructions:
- Preheat your oven to 350°F (175°C) and line a baking sheet with parchment paper. This will help the biscuits cook evenly and prevent them from sticking to the pan.
- Open the can of biscuits and separate them. Flatten each biscuit into a round disc about 1/4 inch thick using your fingers or a rolling pin. This will create a larger surface area for your toppings.
- Place the flattened biscuits onto the prepared baking sheet, spacing them about 1 inch apart. This allows them to rise properly and guarantees they don’t stick together while baking.
- In a mixing bowl, combine the shredded cheddar cheese, crumbled bacon, diced green onions, salt, and pepper. Stir until well mixed, then spoon an even amount of the mixture onto each biscuit disc.
- Bake in the preheated oven for 10-12 minutes or until the biscuits are golden brown and the cheese is melted and bubbly. Keep an eye on them to prevent over-baking.
- Once baked, remove the Loaded Biscuit Bites from the oven and let them cool for a few minutes. Drizzle with sour cream and ranch dressing before serving for an extra burst of flavor.
Extra Tips: Feel free to experiment with different toppings to suit your taste! You can add cooked sausage, diced bell peppers, or even different types of cheese.
If you prefer a bit of heat, consider adding jalapeños or a sprinkle of hot sauce. These Loaded Biscuit Bites are best enjoyed fresh from the oven, but they can also be reheated in the microwave for a quick snack later on. Enjoy your delicious creation!
Biscuit Shepherd’s Pie

Title: Biscuit Shepherd’s Pie
Prep Time: 20 minutes
Cook Time: 30 minutes
Number of Servings: 6
Required Equipment List: Oven-safe skillet, mixing bowl, spoon, measuring cups, measuring spoons
Cuisine Type: American
Biscuit Shepherd’s Pie is a comforting, hearty dish that combines the traditional flavors of shepherd’s pie with the delightful flakiness of biscuits. This recipe features a savory filling made from ground meat, vegetables, and a rich gravy, all topped with buttery biscuit dough that bakes to golden perfection.
It’s an ideal meal for family gatherings or a cozy weeknight dinner, as it’s simple to prepare and packed with flavor. The beauty of this dish lies in its versatility; you can easily swap out ingredients based on what you have on hand.
Whether you prefer beef, lamb, or a meatless option with lentils, this shepherd’s pie is sure to satisfy. The combination of the crispy biscuit topping with the warm, flavorful filling creates a delightful contrast that will leave everyone asking for seconds.
Ingredients:
- 1 pound ground beef or lamb
- 1 cup frozen mixed vegetables (peas, carrots, corn)
- 1 small onion, diced
- 2 cloves garlic, minced
- 1 cup beef broth
- 2 tablespoons Worcestershire sauce
- 1 teaspoon dried thyme
- Salt and pepper to taste
- 1 can (16.3 ounces) refrigerated biscuit dough
- 1 cup shredded cheddar cheese (optional)
Instructions:
- Preheat your oven to 400°F (200°C). In an oven-safe skillet over medium heat, brown the ground beef or lamb, breaking it apart with a spoon until it’s cooked through. Drain any excess fat.
- Add the diced onion and minced garlic to the skillet, cooking for 2-3 minutes until the onion is translucent. Stir in the frozen mixed vegetables, beef broth, Worcestershire sauce, dried thyme, salt, and pepper. Bring the mixture to a simmer, letting it cook for about 5 minutes until slightly thickened.
- Remove the skillet from heat and, if desired, stir in the shredded cheddar cheese for an extra creamy texture. This step is optional but adds a wonderful flavor to the filling.
- Open the can of biscuit dough and separate the biscuits. Arrange them evenly on top of the meat and vegetable mixture, making sure to cover the filling as much as possible.
- Bake in the preheated oven for 20-25 minutes or until the biscuit topping is golden brown and cooked through. If necessary, you can broil for an additional 2-3 minutes to achieve a crispier top.
- Once baked, remove the skillet from the oven and let it cool for a few minutes before serving. This dish is delicious on its own or paired with a simple salad.
Extra Tips: For added flavor, consider seasoning the meat mixture with your favorite herbs, such as rosemary or oregano. You can also experiment with different types of cheese or add a splash of heavy cream to the filling for a richer taste.
If you have leftovers, this dish reheats wonderfully in the microwave or oven, making it a perfect meal prep option!
Biscuit Waffles With Syrup

Title: Biscuit Waffles With Syrup
Prep Time: 10 minutes
Cook Time: 15 minutes
Number of Servings: 4
Required Equipment List: Waffle iron, mixing bowl, measuring cups, measuring spoons, spatula
Cuisine Type: American
Biscuit Waffles With Syrup is a delightful breakfast treat that combines the fluffy, buttery goodness of biscuits with the crispy texture of waffles. This recipe is incredibly easy to prepare, making it perfect for busy mornings or leisurely weekend brunches.
The waffles are light, airy, and can be topped with your favorite syrup or fresh fruit for an added burst of flavor. They’re sure to satisfy both kids and adults alike!
Using Pillsbury refrigerated biscuits as the base for this recipe makes it accessible and quick, requiring minimal ingredients and time. Simply pop open the can, place the biscuits in the waffle iron, and in minutes, you’ll have golden, fluffy waffles ready to enjoy.
Serve these delicious waffles with maple syrup, whipped cream, or fresh berries for a delightful start to your day.
Ingredients:
- 1 can (16.3 oz) Pillsbury refrigerated biscuits
- Non-stick cooking spray
- Maple syrup (for serving)
- Fresh berries or whipped cream (optional, for serving)
Instructions:
- Preheat your waffle iron according to the manufacturer’s instructions. If your waffle iron requires it, lightly spray the plates with non-stick cooking spray to guarantee the biscuits don’t stick during cooking.
- Open the can of Pillsbury refrigerated biscuits and separate them. Depending on your waffle iron size, you can cut the biscuits in half or leave them whole for thicker waffles.
- Place the biscuits in the preheated waffle iron. If using whole biscuits, place one biscuit in each section of the waffle iron, guaranteeing they’re evenly distributed to avoid overflow.
- Close the waffle iron and cook the biscuits according to your waffle iron’s instructions, typically around 4-5 minutes, or until they’re golden brown and fully cooked.
- Carefully remove the waffles from the waffle iron using a spatula. Serve warm with a drizzle of maple syrup. If desired, top with fresh berries or a dollop of whipped cream for extra flavor.
Extra Tips: For a fun twist, consider adding a sprinkle of cinnamon or a few chocolate chips to the biscuits before cooking them in the waffle iron.
You can also experiment with flavored syrups, such as berry or caramel, to add a unique touch. These biscuit waffles can be prepared in advance and reheated in the toaster for a quick breakfast option throughout the week. Enjoy your delicious creation!
Biscuit Pudding Dessert
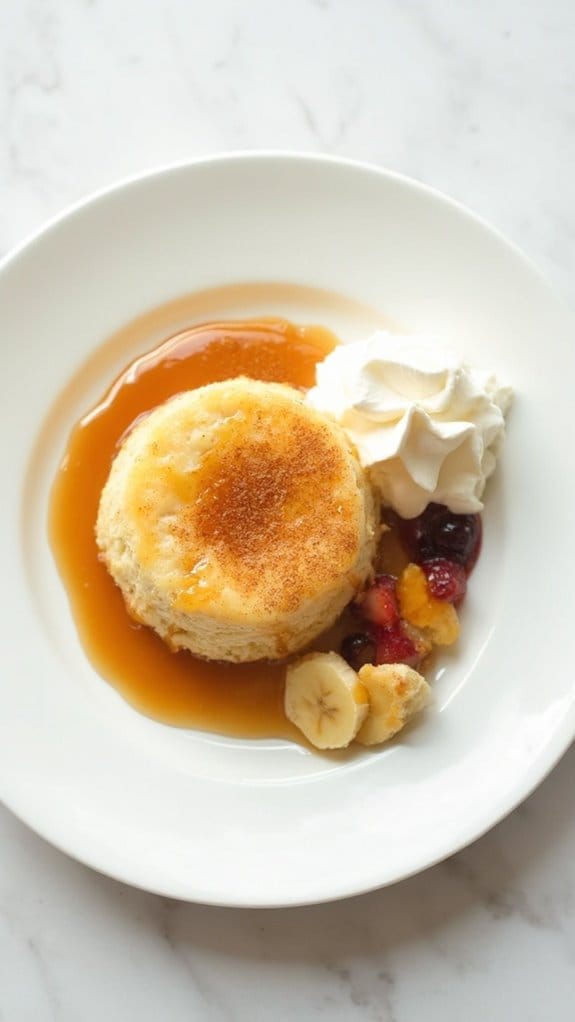
Title: Biscuit Pudding Dessert
Prep Time: 15 minutes
Cook Time: 30 minutes
Number of Servings: 8
Required Equipment List: Baking dish, mixing bowl, whisk, oven
Cuisine Type: American
Biscuit Pudding Dessert is a delightful and comforting dish that takes the classic flavors of bread pudding and gives it a modern twist using Pillsbury biscuits. This dessert is incredibly easy to whip up, making it perfect for both everyday indulgence and special occasions.
The warm, custardy filling pairs beautifully with the flaky, buttery biscuits, resulting in a texture that’s both soft and slightly crispy on top. Topped with a drizzle of caramel or whipped cream, this dessert is sure to impress your family and friends.
What makes this recipe even more appealing is its versatility. You can customize it with your favorite fruits, such as fresh berries or sliced bananas, and even add chocolate chips for a decadent touch. Whether served warm or at room temperature, Biscuit Pudding Dessert is a crowd-pleaser that will elevate any meal, leaving everyone wanting more.
Ingredients:
- 2 cans of Pillsbury refrigerated biscuits
- 4 large eggs
- 2 cups milk
- 1 cup sugar
- 1 teaspoon vanilla extract
- 1 teaspoon ground cinnamon
- 1/2 cup raisins or chocolate chips (optional)
- Caramel sauce or whipped cream for serving (optional)
Instructions:
- Preheat your oven to 350°F (175°C). Grease a 9×13-inch baking dish with butter or non-stick spray to guarantee the pudding doesn’t stick during baking. This step is essential for easy serving later on.
- Open the cans of refrigerated biscuits and cut each biscuit into quarters. Place the biscuit pieces evenly in the prepared baking dish. If you’re using raisins or chocolate chips, sprinkle them over the biscuit pieces for added flavor and texture.
- In a mixing bowl, whisk together the eggs, milk, sugar, vanilla extract, and ground cinnamon until well combined. This mixture will create the custard that binds the biscuits together and adds moisture to the dish.
- Pour the egg and milk mixture evenly over the biscuit pieces in the baking dish, making sure to cover them completely. Use a fork or spoon to gently press the biscuit pieces down into the custard, ensuring they absorb the liquid.
- Bake in the preheated oven for 25-30 minutes or until the top is golden brown and a knife inserted in the center comes out clean. Keep an eye on it towards the end of the baking time to prevent over-browning.
- Once baked, remove the dessert from the oven and let it cool for a few minutes before slicing. Serve warm, drizzled with caramel sauce or topped with whipped cream for an extra special treat.
Extra Tips: For a more indulgent version, consider adding a layer of chocolate chips or fresh fruit between the layers of biscuit pieces. You can also experiment with different flavorings, such as almond extract instead of vanilla, or adding a pinch of nutmeg for a warm spice flavor.
This dessert can be made ahead of time and reheated, making it a great option for entertaining guests. Enjoy your Biscuit Pudding Dessert!
Spicy Biscuit Sliders

Title: Spicy Biscuit Sliders
Prep Time: 15 minutes
Cook Time: 20 minutes
Number of Servings: 8
Required Equipment List: Baking sheet, mixing bowl, skillet, spatula, oven
Cuisine Type: American
These Spicy Biscuit Sliders are a flavorful twist on traditional sliders, perfect for parties, game days, or an easy weeknight dinner. Using Pillsbury biscuits as the base, these sliders are filled with a spicy mixture of ground meat, cheese, and zesty seasonings, making them irresistible to everyone who tries them.
The flaky biscuits provide a delightful contrast to the savory filling, ensuring each bite is packed with flavor. What sets these sliders apart is the ability to customize the spice level according to your taste. You can use ground turkey, beef, or even vegetarian options while adjusting spices like cayenne pepper or jalapeños for an extra kick.
These sliders aren’t only delicious but also quick to assemble, making them an ideal option for feeding a crowd or satisfying late-night cravings.
Ingredients:
- 1 can (16.3 oz) Pillsbury refrigerated biscuits
- 1 pound ground beef (or turkey)
- 1 cup shredded cheddar cheese
- 1/2 cup diced jalapeños (fresh or pickled)
- 1 tablespoon chili powder
- 1 teaspoon garlic powder
- 1 teaspoon onion powder
- Salt and pepper to taste
- 1/4 cup mayonnaise
- 1 tablespoon hot sauce (optional)
Instructions:
- Preheat your oven to 350°F (175°C). Line a baking sheet with parchment paper to prevent sticking and facilitate easy cleanup.
- In a skillet over medium heat, cook the ground beef (or turkey), breaking it apart with a spatula until browned and cooked through, about 5-7 minutes. Drain any excess fat, then stir in the chili powder, garlic powder, onion powder, jalapeños, salt, and pepper.
- Cook for an additional 2-3 minutes to combine flavors. Remove the skillet from heat and mix in the shredded cheddar cheese until melted and evenly distributed.
- In a small bowl, mix the mayonnaise with hot sauce if desired for added spice.
- Open the can of biscuits and separate each biscuit. Flatten each biscuit slightly with your hands, then place a generous spoonful of the spicy meat mixture in the center.
- Fold the edges of the biscuit over the filling and pinch to seal, forming a slider. Place the sealed sliders on the prepared baking sheet, seam side down.
- Bake in the preheated oven for 12-15 minutes, or until the biscuits are golden brown and cooked through.
- Once baked, allow the sliders to cool for a few minutes before serving. Drizzle with the spicy mayonnaise for an extra kick and enjoy!
Extra Tips: For an even spicier experience, consider adding some crushed red pepper flakes to the meat mixture or topping the sliders with spicy pickles.
You can also experiment with different types of cheese, such as pepper jack or mozzarella, to find your favorite combination. These sliders are best served warm and can be enjoyed with a side of crispy fries or a fresh salad for a complete meal.
Biscuit Stuffed Peppers

Title: Biscuit Stuffed Peppers
Prep Time: 15 minutes
Cook Time: 30 minutes
Number of Servings: 4
Required Equipment List: Baking dish, mixing bowl, knife, spoon, oven
Cuisine Type: American
Biscuit Stuffed Peppers are a delicious and creative twist on traditional stuffed peppers, perfect for a hearty meal. This recipe features vibrant bell peppers filled with a savory mixture of Pillsbury biscuits, cheese, and spices, offering a comforting dish that’s both easy to prepare and satisfying.
The fluffy biscuit dough bakes up beautifully, creating a delightful contrast to the tender peppers, making each bite a flavorful experience. This dish is incredibly versatile, allowing you to customize the filling based on your preferences or what you have on hand.
Whether you choose to add cooked sausage, vegetables, or different types of cheese, the biscuit base guarantees that every pepper is a tasty delight. Ideal for family dinners or casual gatherings, these Biscuit Stuffed Peppers will surely become a favorite in your household.
Ingredients:
- 4 large bell peppers (any color)
- 1 can (16.3 oz) Pillsbury refrigerated flaky biscuits
- 1 cup shredded cheese (cheddar, mozzarella, or your choice)
- 1/2 cup cooked sausage or ground beef (optional)
- 1/2 cup diced onions
- 1/2 teaspoon garlic powder
- 1/2 teaspoon Italian seasoning
- Salt and pepper to taste
- Olive oil (for drizzling)
Instructions:
- Preheat your oven to 375°F (190°C). Prepare a baking dish by lightly greasing it with cooking spray or a drizzle of olive oil. This will prevent the stuffed peppers from sticking during baking.
- Carefully slice the tops off the bell peppers and remove the seeds and membranes. Place the hollowed-out peppers upright in the prepared baking dish, setting them aside while you prepare the filling.
- In a mixing bowl, cut the Pillsbury biscuits into quarters. Add the shredded cheese, cooked sausage or ground beef (if using), diced onions, garlic powder, Italian seasoning, salt, and pepper. Mix everything together until well combined.
- Spoon the biscuit mixture into each of the prepared bell peppers, packing them down gently to fit the filling. Drizzle a little olive oil over the tops of the filled peppers for added flavor and moisture.
- Cover the baking dish with aluminum foil and bake in the preheated oven for 20 minutes. After 20 minutes, remove the foil and continue baking for an additional 10 minutes, or until the biscuits are golden brown and the peppers are tender.
- Once baked, remove the stuffed peppers from the oven and let them cool for a few minutes. Serve warm and enjoy the combination of flaky biscuit and flavorful filling!
Extra Tips: For added flavor, consider sautéing the diced onions before mixing them into the filling. You can also sprinkle some additional cheese on top of the peppers during the last 5 minutes of baking for a cheesy crust.
If you have leftover filling, it can be baked in a small dish alongside the peppers for a tasty side dish. Enjoy experimenting with different flavors and ingredients to make this dish your own!
Biscuit Monkey Bread

Title: Biscuit Monkey Bread
Prep Time: 15 minutes
Cook Time: 30 minutes
Number of Servings: 8
Required Equipment List: Bundt pan, mixing bowl, oven, measuring cups and spoons
Cuisine Type: American
Biscuit Monkey Bread is a delicious and fun treat that’s perfect for brunch or dessert. This dish takes flaky biscuit dough and combines it with a sweet cinnamon sugar mixture, resulting in a pull-apart bread that’s both warm and comforting. The gooey texture and rich flavor make it a delightful centerpiece for any gathering, and it’s sure to please both kids and adults alike.
This recipe isn’t only easy to make but also allows for creativity with ingredients. You can customize your monkey bread by adding chocolate chips, nuts, or even fruit to the mix. The combination of buttery biscuits and a sticky caramel glaze makes every bite irresistible, and the dish can be made ahead of time and baked fresh for an impressive presentation.
Ingredients:
- 2 cans (16.3 oz each) refrigerated biscuit dough
- 1 cup granulated sugar
- 2 tablespoons ground cinnamon
- 1/2 cup unsalted butter, melted
- 1/2 cup packed brown sugar
- Optional: 1 cup chocolate chips or nuts
Instructions:
- Preheat your oven to 350°F (175°C). Grease a Bundt pan with cooking spray or butter to prevent the monkey bread from sticking.
- In a mixing bowl, combine the granulated sugar and ground cinnamon. Cut each biscuit into quarters and toss them in the cinnamon sugar mixture until well coated.
- Layer half of the coated biscuit pieces in the bottom of the prepared Bundt pan. If desired, sprinkle half of the chocolate chips or nuts over this layer.
- Pour half of the melted butter over the first layer of biscuits, followed by the remaining biscuit pieces. Top with the remaining chocolate chips or nuts if using.
- In a separate bowl, mix the brown sugar with the remaining melted butter, then pour this mixture evenly over the top of the biscuits in the Bundt pan.
- Bake in the preheated oven for 30-35 minutes or until the monkey bread is golden brown and cooked through. Remove from the oven and let it cool in the pan for about 10 minutes before inverting it onto a serving plate.
Extra Tips: For added flavor, consider using flavored extracts like vanilla or almond in the melted butter mixture. If you prefer a caramel sauce, you can substitute the brown sugar with a store-bought caramel sauce for drizzling after baking.
Serve warm, and don’t forget to provide forks or napkins; this monkey bread is messy but oh-so-delicious!
Biscuit Veggie Frittata

Title: Biscuit Veggie Frittata
Prep Time: 15 minutes
Cook Time: 25 minutes
Number of Servings: 6
Required Equipment List: Oven-safe skillet, mixing bowl, whisk, knife, cutting board
Cuisine Type: American
This Biscuit Veggie Frittata is a delightful and hearty dish that combines the flakiness of Pillsbury biscuits with a mix of fresh vegetables and eggs. It’s perfect for breakfast, brunch, or even a light dinner, making it a versatile recipe for any occasion.
The addition of biscuits creates a unique texture that complements the fluffy eggs and vibrant veggies, offering a satisfying meal that everyone will love. What makes this frittata special is its adaptability; you can easily customize the vegetables based on what you have on hand or what’s in season. Spinach, bell peppers, and tomatoes are just a few options that work beautifully in this dish.
Additionally, it can be served warm or at room temperature, making it an ideal choice for meal prep or entertaining guests.
Ingredients:
- 1 can Pillsbury refrigerated biscuits
- 6 large eggs
- 1/2 cup milk
- 1 cup chopped spinach
- 1/2 cup diced bell pepper
- 1/2 cup cherry tomatoes, halved
- 1/2 cup shredded cheese (e.g., cheddar or mozzarella)
- Salt and pepper to taste
- 1 tablespoon olive oil
Instructions:
- Preheat your oven to 375°F (190°C). This temperature will help cook the frittata evenly and allow the biscuits to rise and brown nicely.
- In a mixing bowl, whisk together the eggs and milk until well combined. Season with salt and pepper to taste, then set aside.
- In an oven-safe skillet, heat the olive oil over medium heat. Add the chopped spinach and diced bell pepper, sautéing for about 3-4 minutes until the vegetables are tender. If using cherry tomatoes, add them in the last minute of cooking.
- Remove the skillet from heat and pour the egg mixture over the sautéed vegetables. Gently stir to combine, then add the shredded cheese on top.
- Open the can of biscuits and cut each biscuit into quarters. Arrange the biscuit pieces evenly over the egg and veggie mixture. This will create a delightful texture once baked.
- Transfer the skillet to the preheated oven and bake for 20-25 minutes, or until the eggs are set and the biscuits are golden brown. A toothpick inserted in the center should come out clean.
- Once baked, allow the frittata to cool for a few minutes before slicing. Serve warm, garnished with additional cheese or herbs if desired.
Extra Tips: Feel free to mix and match your favorite vegetables or even add cooked meats like bacon or sausage for more flavor. If you prefer a spicier kick, consider adding a pinch of red pepper flakes to the egg mixture.
This frittata can be stored in the refrigerator for up to 3 days, making it perfect for meal prep or leftovers!
Biscuit Chocolate Chip Cookies

Title: Biscuit Chocolate Chip Cookies
Prep Time: 10 minutes
Cook Time: 12 minutes
Number of Servings: 24 cookies
Required Equipment List: Baking sheet, parchment paper, mixing bowl, spoon, measuring cups, measuring spoons
Cuisine Type: American
Biscuit Chocolate Chip Cookies are a delightful and convenient treat that combines the fluffy texture of biscuits with the beloved flavor of chocolate chip cookies. This recipe utilizes Pillsbury biscuit dough as a base, making it incredibly simple and quick to whip up. The result is a batch of soft, chewy cookies that are perfect for satisfying your sweet tooth or sharing with friends and family at gatherings.
These cookies aren’t only easy to make, but they also offer a wonderful canvas for customization. Feel free to add nuts, dried fruits, or even a sprinkle of sea salt on top for an extra flavor boost. Best enjoyed warm from the oven, these Biscuit Chocolate Chip Cookies are sure to become a favorite in your household.
Ingredients:
- 1 can (16.3 oz) Pillsbury Grands! Biscuits
- 1 cup chocolate chips
- 1/2 cup brown sugar, packed
- 1/4 cup granulated sugar
- 1/2 teaspoon vanilla extract
- 1/2 teaspoon baking soda
- 1/4 teaspoon salt
Instructions:
- Preheat your oven to 350°F (175°C) and line a baking sheet with parchment paper to guarantee easy removal of the cookies once baked.
- In a mixing bowl, break apart each biscuit into quarters. Using your hands, gently knead the biscuit pieces together until they form a cohesive dough.
- Add the brown sugar, granulated sugar, vanilla extract, baking soda, and salt to the biscuit dough. Mix until all ingredients are well combined, guaranteeing the sugars are evenly distributed throughout the dough.
- Fold in the chocolate chips, mixing just until they’re incorporated into the dough. Be careful not to overmix, as you want to maintain the soft texture of the biscuits.
- Using a tablespoon or cookie scoop, drop rounded balls of dough onto the prepared baking sheet, spacing them about 2 inches apart to allow for spreading while baking.
- Bake in the preheated oven for 10-12 minutes or until the edges are lightly golden and the centers are set. Remove from the oven and let the cookies cool on the baking sheet for a few minutes before transferring them to a wire rack to cool completely.
Extra Tips: For an added touch, you can sprinkle a little sea salt on top of the cookies right before baking to enhance the chocolate flavor. If you prefer a more cake-like texture, you can add an extra tablespoon of flour to the dough. These cookies are best enjoyed fresh out of the oven, but they can be stored in an airtight container for a few days if you have any leftovers.
Conclusion
So there you have it—19 delicious ways to turn a simple can of Pillsbury biscuits into culinary masterpieces! Whether you’re whipping up a breakfast sandwich fit for a king or indulging in sweet cinnamon roll biscuits that would make even the most stoic of taste buds rejoice, the possibilities are endless. Why settle for ordinary when you can elevate your meals? Grab that dough and start experimenting—your next family dinner could become a legendary feast!

