
No products in the cart.
Contents
hide
Zombie Fingers (Pigs in a Blanket)
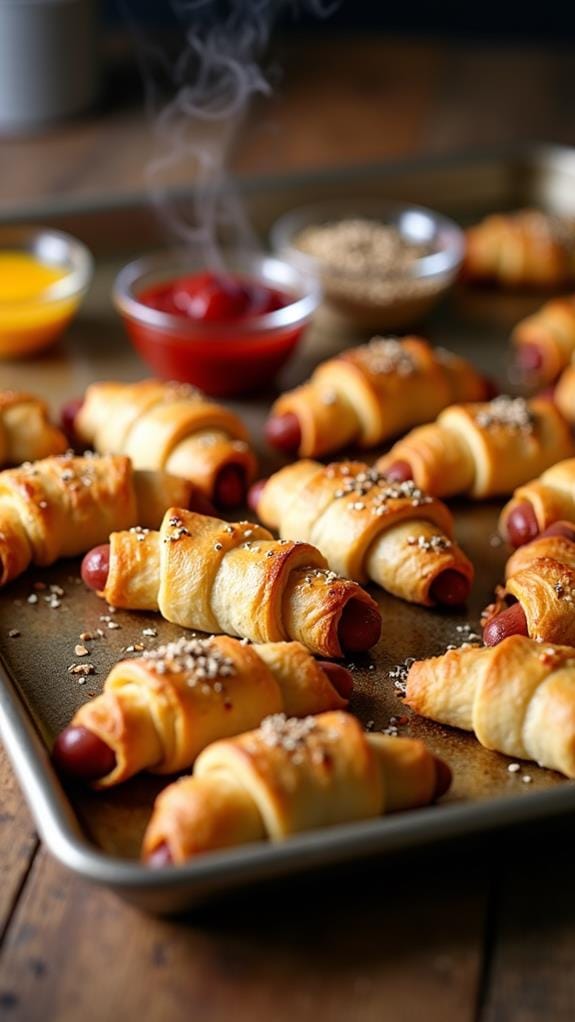
Want to add a spine-chilling twist to your Halloween party? Try Zombie Fingers, a creepy take on classic pigs in a blanket. You’ll wrap cocktail sausages in crescent roll dough and bake until golden brown for a deliciously familiar taste. These ghoulish treats are easy to make, can be prepped in advance, and are sure to be a hit with guests of all ages. Serve them on a dark platter with “blood” dipping sauce for maximum impact. Ready to transform your appetizers into a haunting culinary experience? There’s more to uncover about this spooky snack sensation.
Zombie Fingers History
While the exact origins of Zombie Fingers are unclear, they’re a modern twist on the classic “pigs in a blanket” appetizer. You might be wondering, “How did we get from simple wrapped sausages to gruesome finger-shaped treats?” Well, it’s all part of the evolution of Halloween cuisine.
Pigs in a blanket have been around since the 1600s, but their transformation into spooky finger food is a recent development. As Halloween parties became more elaborate in the late 20th century, creative hosts began reimagining traditional snacks with a macabre flair. The idea of turning innocent appetizers into creepy delicacies caught on quickly.
Have you ever noticed how food can set the tone for a party?
Zombie Fingers emerged as a perfect blend of nostalgia and novelty, appealing to both kids and adults. They’re not just tasty; they’re conversation starters. By combining familiar flavors with a ghoulish appearance, these treats embody the playful spirit of Halloween.
Isn’t it fascinating how a simple change in presentation can completely transform a dish’s appeal?
Recipe
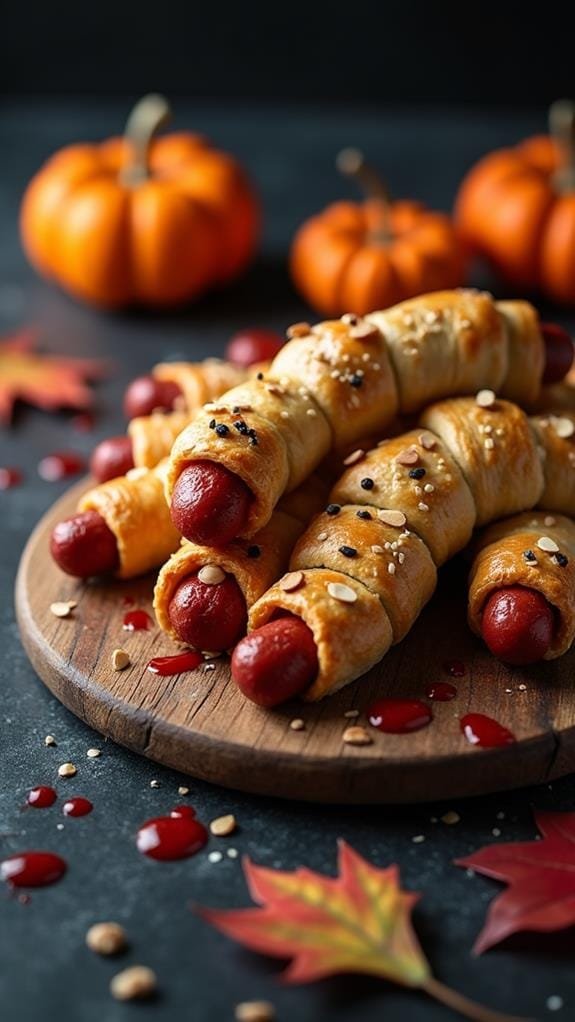
Zombie Fingers, a Halloween twist on classic pigs in a blanket, are a ghoulishly delicious treat perfect for your spooky soiree. These savory snacks resemble severed fingers, made with cocktail sausages wrapped in flaky crescent roll dough, cleverly shaped and decorated to look like undead digits.
Not only do these Zombie Fingers look impressively creepy, but they also taste fantastic. The combination of juicy sausages and buttery pastry creates a perfect balance of flavors and textures that both kids and adults will love. They’re easy to make and can be prepared in advance, making them an ideal party snack for your Halloween gathering.
- 1 package (8 oz) refrigerated crescent roll dough
- 24 cocktail sausages
- 1 large egg, beaten
- 1/4 cup sliced almonds (optional)
- 1 tablespoon poppy seeds
- 1 tablespoon sesame seeds
- Ketchup or red food coloring gel for decorating
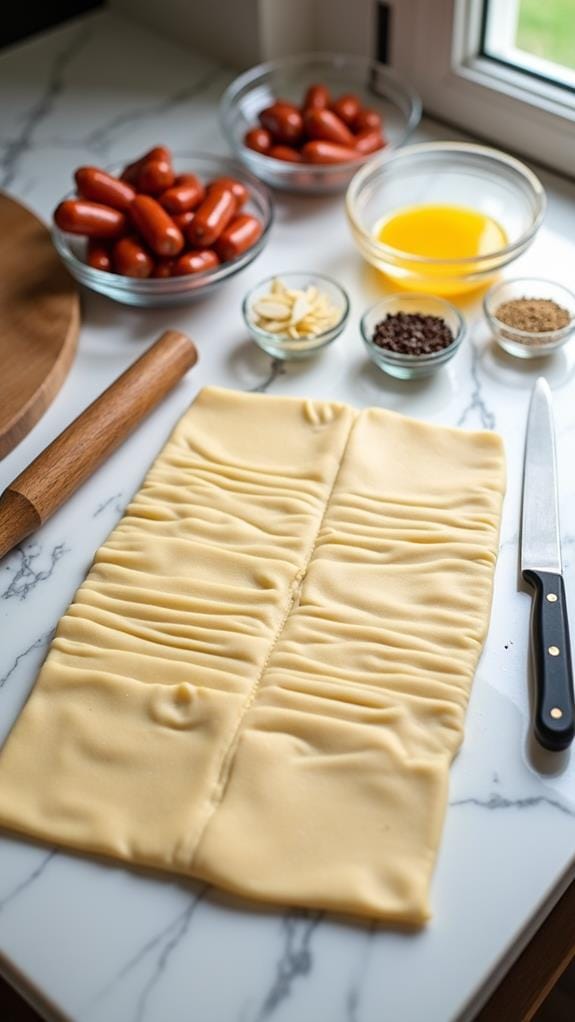
Preheat the oven to 375°F (190°C). Unroll the crescent dough and separate into triangles. Cut each triangle lengthwise into three narrow strips. Wrap each strip around a cocktail sausage, leaving the tip exposed to resemble a fingertip.
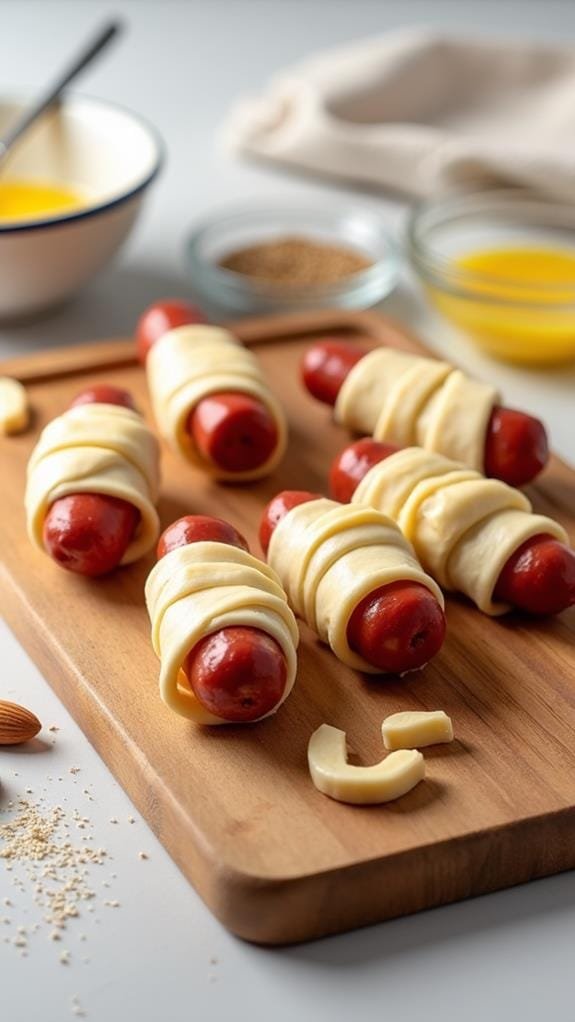
Place the wrapped sausages on a baking sheet lined with parchment paper. Brush each “finger” with beaten egg. For a spooky twist, press a sliced almond onto the tip to create a fingernail. Now the pigs in a blanket will look much more realistic. Creepy! Sprinkle poppy seeds and sesame seeds over the fingers to give them a mottled, undead appearance. Bake for 12-15 minutes or until the dough is golden brown.
Once cooled, use ketchup or red food coloring gel to add “blood” around the fingertips and nail beds for an extra gruesome effect.
For best results, make sure the crescent dough is chilled before working with it, as this will make it easier to handle and shape. If you’re preparing these in advance, you can assemble the Zombie Fingers and refrigerate them for up to 24 hours before baking.
Just remember to brush them with egg wash and add the seeds right before putting them in the oven. To make them even spookier, consider using green food coloring in the egg wash for a moldy look, or experiment with different seeds and spices to create various textures on the “skin.”
Zombie Fingers Prep & Cooking Time
The clock is your friend when preparing these spooky treats. You’ll need about 20 minutes for prep and 15 minutes for cooking, making these Zombie Fingers a quick and easy Halloween snack.
But don’t let the short time fool you – these ghoulish delights pack a big punch in both appearance and taste.
During prep, you’ll want to work efficiently. Can you imagine the satisfaction of transforming simple ingredients into creepy finger-like creations? As you wrap the dough around each sausage, think about how you’ll shape the fingertips, as well as if and where you’ll place the almond “nails.”
Remember, chilling the dough beforehand will make it easier to handle. Once you’ve assembled your undead digits, pop them in the oven and set your timer.
In just 12-15 minutes, you’ll have a tray full of golden-brown, mouthwatering Zombie Fingers. Isn’t it amazing how quickly these come together? The final touch of adding “blood” with ketchup or food coloring is where you can really let your creativity shine.
Are you ready to impress your guests with these frighteningly delicious treats?
Zombie Fingers Cooking Steps
Ready to create some spooky snacks?
You’ll start by preheating your oven to 375°F and preparing the dough, cutting it into strips to wrap around your cocktail sausages.
Once you’ve added the optional almond “fingernails” and sprinkled on the seeds, it’s time to bake these gruesome treats until they’re golden brown and crispy.
Don’t forget to add some “blood” with ketchup or food coloring for that extra zombie-like touch!

Zombie Fingers (Pigs in a Blanket)
Spice up your Halloween party with Zombie Fingers! These creepy pigs in a blanket are easy to make and sure to scare up some fun.
Equipment
- Baking sheet
- Parchment paper
- Knife
- Pastry Brush
- Measuring spoons
Ingredients
- 8 oz crescent roll dough (refrigerated, one package)
- 24 cocktail sausages
- 1 egg (large, beaten)
- 1/4 cup almonds (sliced, optional)
- 1 tbsp poppy seeds
- 1 tbsp sesame seeds
- ketchup (for decoration, optional)
- red food coloring (for decoration, optional)
Instructions
- Step 1. Preheat Oven to 375°FBefore diving into the prep work, preheat your oven to 375°F (190°C).This step is essential for ensuring your Zombie Fingers cook evenly and achieve that perfect golden-brown color.While the oven's heating up, you've got time to gather your ingredients and equipment.Why not use these moments to double-check you've got everything ready?

- Step 2. Unroll and Cut DoughNow that your oven's heating up, it's time to tackle the dough. Grab that package of refrigerated crescent roll dough and carefully unroll it onto a clean, flat surface. You'll see it's divided into triangles – perfect for our ghoulish creation!Here's where precision comes into play: you'll need to cut each triangle lengthwise into three narrow strips. Why three? It's the magic number that'll give you enough dough to wrap around each cocktail sausage while still maintaining that finger-like appearance.As you cut, try to keep the strips as even as possible. This'll guarantee your Zombie Fingers cook uniformly and look eerily consistent.Feeling creative? You could experiment with different cutting techniques to give your fingers varied textures. Maybe try a zigzag cut for a more ragged, decomposed look.Or, if you're feeling particularly daring, why not attempt to create knuckle indentations? Remember, the key to mastering this step is patience and a steady hand. After all, aren't the best zombies the ones with the most character?
- Step 3. Wrap Sausages in DoughWith your dough strips ready, it's time to transform those ordinary cocktail sausages into creepy Zombie Fingers. Take each strip and wrap it carefully around a sausage, leaving the tip exposed to mimic a fingertip.As you work, think about how you want your zombie fingers to look – are they freshly risen from the grave or long-decayed?Make sure to wrap the dough snugly, but not so tight that it tears. You'll want to create some wrinkles and folds in the dough to give your fingers a more realistic, undead appearance.How can you make each finger unique? Try varying the angle of the wrapping or the amount of sausage left exposed. Remember, zombies aren't known for their perfect manicures!As you place each wrapped sausage on the baking sheet, consider their arrangement. Are they reaching out towards their next victim, or lying haphazardly as if they've just fallen off a zombie?This attention to detail will elevate your Zombie Fingers from a simple snack to a showstopping Halloween centerpiece.
- Step 4. Add Almond "Fingernails"After wrapping the sausages, it's time to give your Zombie Fingers their ghastly manicure. Grab your sliced almonds and prepare to transform these snacks into truly creepy creations.You'll want to press an almond slice onto the exposed tip of each sausage, creating a realistic-looking fingernail. Wondering how to make them stick? That's where your beaten egg comes in handy. Brush a small amount of egg wash onto the sausage tip before pressing the almond in place. This will act as a glue, ensuring your "fingernails" stay put during baking.As you work, consider varying the angle and placement of the almonds. Some nails might be straight, while others could be slightly crooked for a more unsettling effect.Are you feeling particularly daring? Try using different nuts or even thinly sliced vegetables for unique nail shapes. Remember, the key to a spine-chilling presentation is in the details.Once you've added all the fingernails, take a step back and admire your handiwork. Your Zombie Fingers are now one step closer to being the star of your Halloween spread!
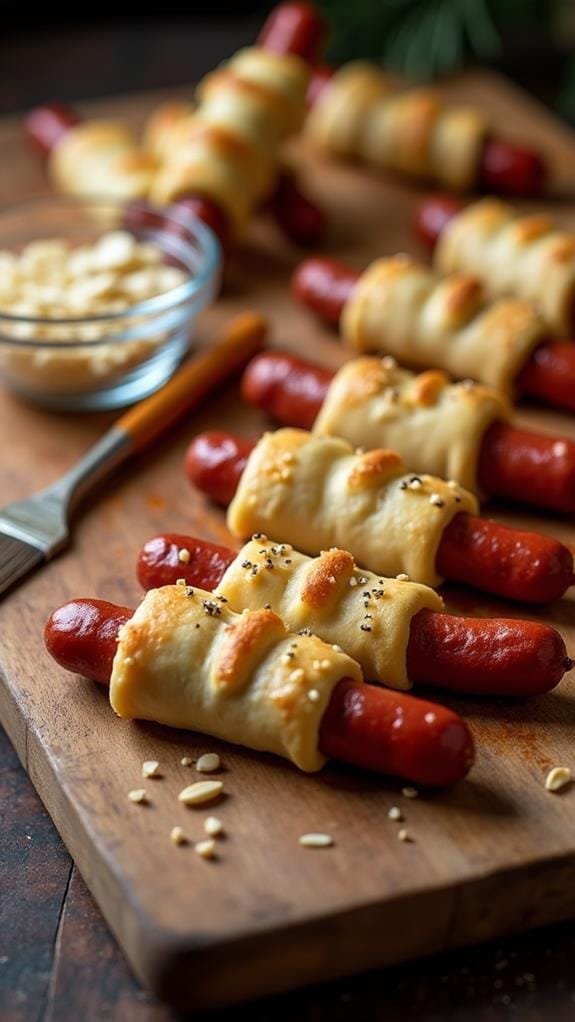
- Step 5. Bake Until Golden BrownYour ghoulish creations are ready for the oven! Now it's time to bring these Zombie Fingers to life. Place your baking sheet in the preheated 375°F (190°C) oven and keep a close eye on them.You'll want to bake these undead delicacies for 12-15 minutes, or until they've achieved that perfect golden-brown hue. Isn't it fascinating how heat transforms dough into a crispy, flaky crust?As you watch them bake, you'll notice the dough puffing up slightly, enveloping the sausages in a warm embrace. The aroma of buttery pastry will fill your kitchen, making it hard to resist peeking.But resist you must! Opening the oven door too often can disrupt the baking process. Instead, use your oven light to monitor their progress.When the Zombie Fingers have reached that ideal golden color, remove them from the oven. Let them cool for a few minutes before handling. After all, you wouldn't want to burn your own fingers on these deliciously spooky treats, would you?
Nutrition
Calories: 301kcalCarbohydrates: 18gProtein: 8gFat: 23gSaturated Fat: 7gPolyunsaturated Fat: 5gMonounsaturated Fat: 8gTrans Fat: 0.01gCholesterol: 50mgSodium: 676mgPotassium: 133mgFiber: 1gSugar: 5gVitamin A: 40IUVitamin C: 0.01mgCalcium: 59mgIron: 2mg
Swaps And Substitutions
Flexibility is key when making Zombie Fingers. Don’t let a lack of ingredients stop you from creating these spooky treats. You can easily swap out components to suit your taste or dietary needs.
For instance, if you’re vegetarian, why not try veggie dogs instead of cocktail sausages? They’ll work just as well and still give you that finger-like appearance.
Can’t find crescent roll dough? No problem! Puff pastry or even homemade pizza dough can be excellent alternatives.
When it comes to decorations, let your creativity run wild. Here are some ideas to get you started:
- Use pumpkin seeds instead of almonds for a more Halloween-themed “nail”
- Try different herbs and spices for varied “skin” textures
- Experiment with food coloring to create ghoulish green or purple fingers
- Add cheese to the dough for extra flavor and a more realistic skin-like texture
Serving Suggestions And Meal Pairings
Presentation is key when serving these ghoulishly delightful Zombie Fingers. Arrange them on a dark platter or cutting board to make the “fingers” stand out.
You can create a spooky scene by adding fake cobwebs, plastic spiders, or even a prop hand for the fingers to “emerge” from. Don’t forget to provide extra “blood” (ketchup or BBQ sauce) on the side for dipping.
When it comes to meal pairings, these Zombie Fingers are versatile enough to complement various Halloween-themed dishes. Consider serving them alongside:
- Witches’ brew punch (a green fruit punch)
- Mummy-wrapped hot dogs (hot dogs wrapped in strips of puff pastry)
- Graveyard dirt cups (chocolate pudding with crushed Oreos and gummy worms)
- Vampire bite cupcakes (red velvet cupcakes with fang marks)
If you’re hosting a full dinner, these appetizers work well with heartier main courses like chili or pulled pork sliders.
Refrigerate up to Three Days
After you’ve served up these spooky treats, you might find yourself with leftovers. Don’t worry! These Zombie Fingers can be refrigerated for up to three days, allowing you to enjoy them even after your Halloween bash.
To store them properly, let them cool completely before placing them in an airtight container. Line the container with paper towels to absorb any excess moisture, which helps maintain their crispy texture.
When you’re ready to reheat your Zombie Fingers, you’ve got options:
- Oven: Preheat to 350°F and warm for 5-7 minutes
- Microwave: Heat in 15-second intervals for a quick fix
- Air fryer: Cook at 350°F for 2-3 minutes for maximum crispiness
- Eat them cold: They’re surprisingly tasty straight from the fridge!
Frequently Asked Questions
Curious about making these spooky Zombie Fingers? Here are some frequently asked questions to help you perfect your creepy culinary creation:
Can you use other types of sausages? Absolutely! While cocktail sausages are ideal, you can experiment with different varieties. Just make sure they’re small enough to wrap easily and cook evenly.
How do you prevent the dough from unraveling? To keep your Zombie Fingers intact, pinch the ends of the dough strips tightly around the sausages. You can also lightly moisten the dough with water to help it stick.
Can you make these vegetarian? Yes! Try using vegetarian sausages or even carrots cut to size. You’ll still get that creepy finger look without the meat.
What dipping sauces work well? Get creative with your “blood” options! Consider:
- Spicy sriracha ketchup
- Smoky barbecue sauce
- Tangy mustard blended with ketchup
- Cranberry sauce for a sweeter twist
Final Thoughts
With those questions addressed, let’s wrap up our Zombie Fingers adventure. You’ve now got all the tools to create a hauntingly delicious Halloween treat that’ll have your guests both impressed and spooked.
Remember, the key to success lies in the details – from the carefully wrapped “skin” to the gruesome “blood” effects. Don’t be afraid to get creative and make these ghoulish snacks your own.
As you prepare for your Halloween gathering, consider how these Zombie Fingers will fit into your overall theme. Will they be the star of the show or part of a larger spread of creepy cuisine?
Think about pairing them with other themed dishes or drinks to create a cohesive and memorable experience for your guests. And don’t forget, presentation is everything!
How will you display these undead delicacies? A serving platter disguised as a mad scientist’s lab tray, perhaps? Whatever you choose, your Zombie Fingers are sure to be a hit.