
Graveyard Dirt Cups
Spooky and sweet, Graveyard Dirt Cups transform your Halloween dessert table into a miniature cemetery. Discover how to create these eerie treats that will
Equipment
- 1 Large bowl
- 1 Whisk
- 1 Rubber spatula
- 1 Food processor or resealable plastic bag and rolling pin
- 8 Clear plastic cups
- 1 2-cup measuring cup
- 1 Spoon for layering
Ingredients
- 3.9 oz instant chocolate pudding mix
- 2 cups cold milk
- 8 oz container whipped topping, thawed
- 14.3 oz chocolate sandwich cookies
- gummy worms
- candy pumpkins
- Milano cookies
- black decorating gel
- green food coloring (optional)
Instructions
- To begin creating your spooky dessert, you'll need to whisk the instant chocolate pudding mix with cold milk. Grab a large bowl and pour in the contents of your pudding mix packet. Measure out two cups of cold milk and add it to the bowl.Now, it's time to put some elbow grease into it! Whisk vigorously for about two minutes, making sure to break up any clumps that might form. You're aiming for a smooth, consistent texture throughout.Once you've whisked for two minutes, set your timer for five minutes and let the mixture rest. This waiting period allows the pudding to set properly, giving you that perfect creamy consistency.While you wait, why not prepare your cookie "dirt"? After the five minutes are up, you'll notice your pudding has thickened nicely.Now comes the fun part – folding in the whipped topping! Gently incorporate it into your pudding, creating a light and airy mixture. This step adds volume and a delightful mousse-like texture to your dirt cups. Ready to layer?
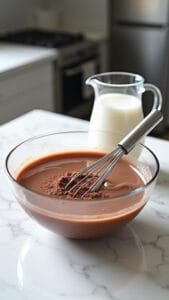
- After letting the pudding set, it's time to incorporate the whipped topping. Grab your container of thawed whipped topping and gently fold it into the pudding mixture.Why fold instead of stir? Folding preserves the air bubbles in the whipped topping, resulting in a lighter, fluffier texture.To fold properly, use a rubber spatula to cut through the center of the pudding mixture. Then, lift and turn the spatula over, bringing the bottom mixture to the top. Rotate the bowl as you go, repeating this motion until the whipped topping is fully incorporated.Don't overmix! You want to maintain that airy consistency.As you fold, you'll notice the pudding mixture becoming lighter in color and texture. This is exactly what you're aiming for. The whipped topping adds a creamy, mousse-like quality to your dirt cups, making them even more irresistible.Once you've achieved a uniform mixture with no streaks of white, you're done. Your pudding base is now ready for the next step in creating your spooky graveyard scene. Excited to see it all come together?

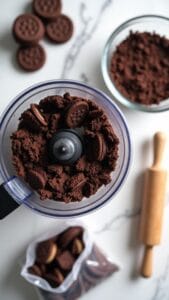
- Now it's time to create the "dirt" for your spooky graveyard scene. Grab your package of chocolate sandwich cookies and get ready to transform them into a crumbly, soil-like mixture.You've got two options for crushing these cookies: the quick and easy food processor method or the more hands-on bag-and-rolling-pin technique.If you're using a food processor, simply toss the cookies in and pulse until you've got a fine, consistent crumb.Don't have a food processor? No problem! Place the cookies in a sturdy, resealable plastic bag and seal it, removing as much air as possible.Now, channel your inner baker-meets-construction-worker and use a rolling pin to crush those cookies into oblivion. Roll, pound, and crush until you've achieved that perfect dirt-like consistency.Want to add some texture? Leave a few larger chunks for a more realistic look.
- The next step in creating your Graveyard Dirt Cups is layering the pudding mixture and crushed cookies. Grab your clear plastic cups and start with a thin layer of crushed cookies at the bottom. This will form the base of your "graveyard soil."Next, spoon in a generous layer of the chocolate pudding mixture, making sure it's evenly spread.Now, here's where you can get creative. How many layers do you want in your dirt cups? For a more visually appealing effect, aim for at least three alternating layers.As you add each layer, think about the texture you're creating. Are you going for a smooth, even look, or do you prefer a more rugged, natural appearance? Remember, these layers will be visible through the clear cup, so take your time to make them look just right.Finish with a top layer of crushed cookies to complete the "dirt" effect. Have you considered adding a slight slope to this final layer? It'll give your graveyard a more realistic, uneven ground appearance.Ready to move on to the fun part – decorating?
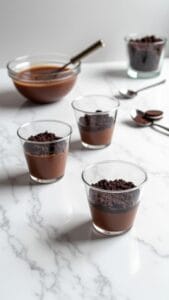
- Every Graveyard Dirt Cup deserves some spooky decorations to bring it to life (or death). Now's your chance to let your creativity shine!Start by carefully placing gummy worms so they're peeking out of the "dirt." Doesn't that add a delightfully creepy touch?Next, nestle a few candy pumpkins on top to create a miniature pumpkin patch.For the pièce de résistance, you'll craft tombstones using Milano cookies. Write "RIP" on each cookie with black decorating gel, then gently insert them into the cups.Want to add an extra layer of realism? Mix a few drops of green food coloring into some whipped topping and dot it around the base of the tombstones to mimic moss.

Nutrition
Serving: 1gCalories: 355kcalCarbohydrates: 55gProtein: 4gFat: 13gSaturated Fat: 5gPolyunsaturated Fat: 2gMonounsaturated Fat: 5gTrans Fat: 0.03gCholesterol: 4mgSodium: 428mgPotassium: 165mgFiber: 2gSugar: 35gVitamin A: 61IUCalcium: 60mgIron: 6mg