
No products in the cart.
Easy Graveyard Dirt Cups – A Halloween Treat Sure To Delight
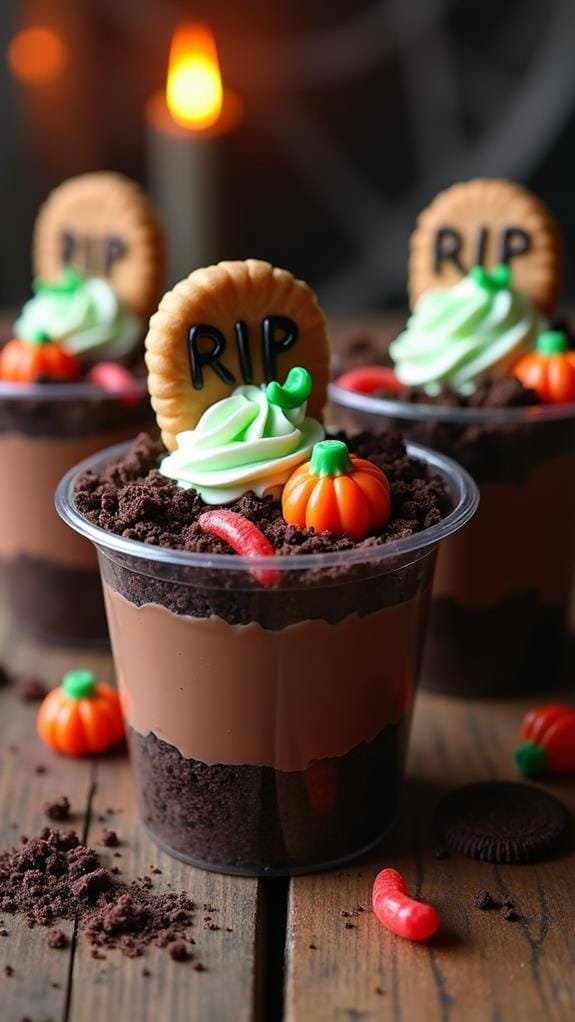
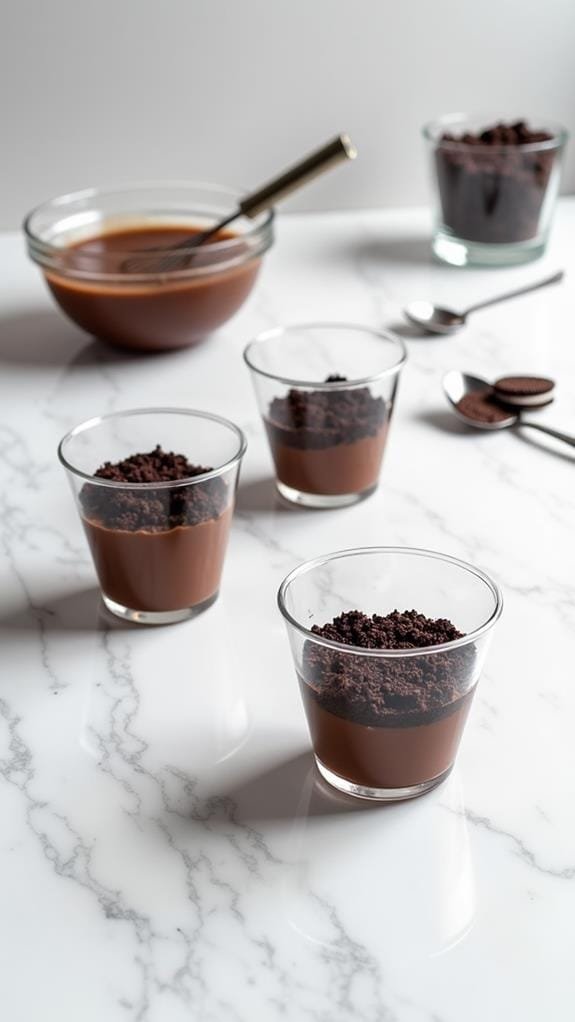
Graveyard Dirt Cups are a spooky Halloween treat that’ll transform your dessert table into a miniature cemetery. You’ll love how easy they are to make! These no-bake cups combine creamy chocolate pudding with crushed chocolate cookies to create a realistic “dirt” effect. Layer the ingredients in clear cups, then decorate with gummy worms, candy pumpkins, and cookie tombstones for a ghoulishly good presentation. They’re quick to prepare, taking only about 20 minutes, plus chilling time. Kids and adults alike will enjoy the playful, interactive nature of these treats. Want to make them healthier or accommodate dietary restrictions? There are plenty of ways to customize these eerie desserts.
Contents
hide
Graveyard Dirt Cups History
The origins of Graveyard Dirt Cups can be traced back to the 1990s when they first gained popularity as a fun Halloween treat. You might wonder how such a simple dessert became a Halloween staple. Well, it’s all about creativity and nostalgia. Remember those childhood moments of playing with your food? Graveyard Dirt Cups tap into that playful spirit while embracing the spooky season.
As Halloween parties evolved, hosts sought innovative ways to entertain guests. Enter the Dirt Cup – a perfect blend of taste and visual appeal.
But who added the ‘graveyard’ twist? It’s likely a collective effort of imaginative party planners and parents. The idea spread through magazines, cooking shows, and eventually, the internet. You’ve probably seen variations pop up on social media platforms in recent years.
What makes these treats endure? It’s their versatility and ease of preparation. You can customize them for any age group or dietary need.
Plus, they’re a great way to get kids involved in the kitchen. Haven’t tried making them yet? Why not start a new Halloween tradition this year?
Recipe
Graveyard Dirt Cups are a spooky and delicious Halloween treat that’s perfect for parties, gatherings, or just a fun family dessert night. These no-bake desserts combine creamy pudding, crushed cookies, and candy decorations to create a miniature graveyard scene that’s as fun to make as it’s to eat.
The “dirt” in these cups is made from crushed chocolate sandwich cookies, which provides a rich, chocolatey base for the pudding. Gummy worms, candy pumpkins, and cookie tombstones add playful elements to the dessert, making it a hit with both kids and adults alike. The individual serving size makes these treats easy to distribute and enjoy without the need for utensils.
- 1 package (3.9 oz) instant chocolate pudding mix
- 2 cups cold milk
- 1 (8 oz) container whipped topping, thawed
- 1 package (14.3 oz) chocolate sandwich cookies
- 8-10 clear plastic cups (9-10 oz size)
- Gummy worms
- Candy pumpkins
- Milano cookies
- Black decorating gel
- Green food coloring (optional)
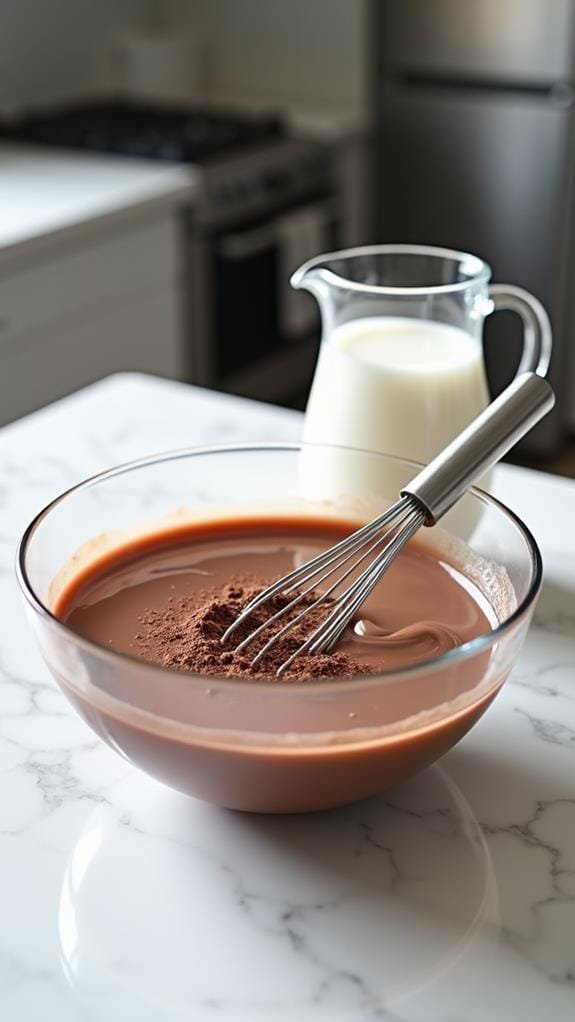
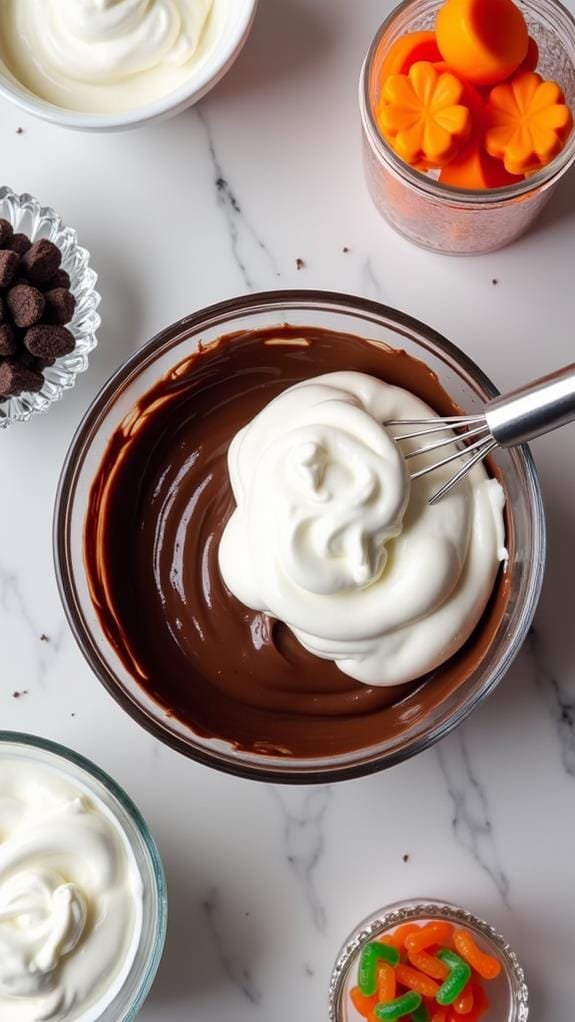
In a large bowl, whisk together the pudding mix and cold milk for 2 minutes. Let it set for 5 minutes, then fold in the whipped topping.
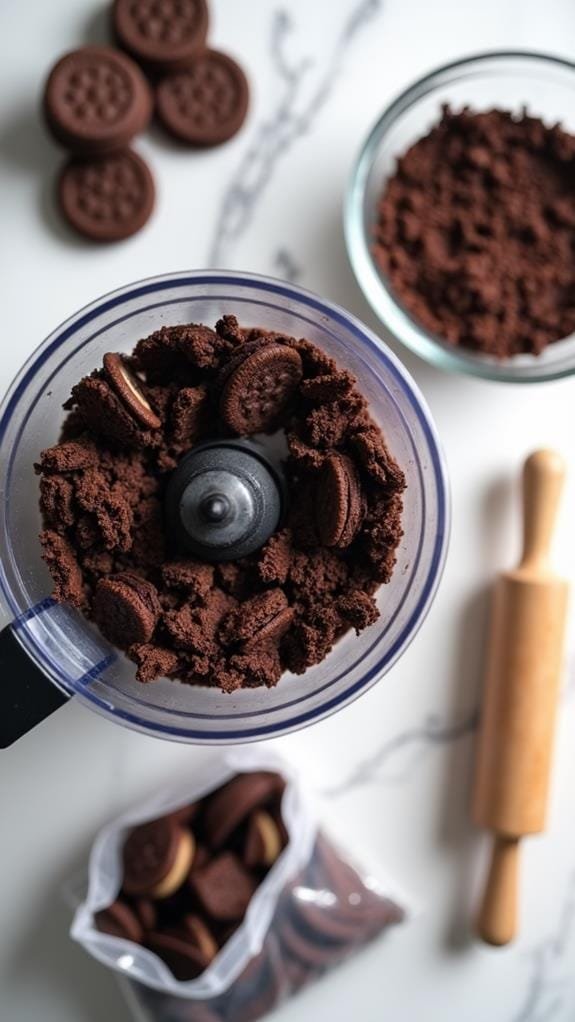
Crush the chocolate sandwich cookies in a food processor or by placing them in a resealable bag and crushing with a rolling pin. In each cup, alternate layers of pudding mixture and crushed cookies, starting and ending with cookies. Refrigerate for at least 1 hour.
Before serving, decorate the tops with gummy worms and candy pumpkins. Create tombstones by writing “RIP” on Milano cookies using black decorating gel, and stick them into the cups. For an extra touch, mix a few drops of green food coloring into some whipped topping and add small dots to represent moss on the “dirt.”
For best results, make these cups a few hours in advance or the night before serving to allow the flavors to meld and the cookies to soften slightly. If you’re concerned about the cups tipping over, consider using shorter, wider containers.
To make this recipe more adult-friendly, you can add a splash of coffee liqueur to the pudding mixture. For a healthier version, use sugar-free pudding mix and low-fat whipped topping.
Graveyard Dirt Cups Prep & Cooking Time
Preparation for Graveyard Dirt Cups is quick and straightforward, taking only about 20 minutes.
You’ll spend most of this time whisking the pudding, crushing cookies, and assembling the layers. Isn’t it great when a dessert comes together so easily? There’s no actual cooking involved, which means you won’t have to worry about heating up your kitchen or monitoring oven temperatures.
Once you’ve layered your cups, you’ll want to refrigerate them for at least an hour. This chilling time isn’t included in the prep, but it’s essential for allowing the flavors to meld and the cookies to soften slightly.
While they’re chilling, why not use that time to get creative with your decorations? You could even turn it into a fun activity, inviting friends or family to design their own spooky graveyards.
Graveyard Dirt Cups Cooking Steps
Ready to create your spooky Graveyard Dirt Cups?
You’ll start by whisking pudding mix with milk and folding in whipped topping, then crushing those chocolate sandwich cookies for the “dirt” layer.
Next, you’ll layer your creamy mixture with the cookie crumbs in clear cups, before adding the final touch – decorating with gummy worms, candy pumpkins, and homemade tombstones.
Who knew making a mini graveyard could be so fun and tasty?

Graveyard Dirt Cups
Spooky and sweet, Graveyard Dirt Cups transform your Halloween dessert table into a miniature cemetery. Discover how to create these eerie treats that will
Equipment
- 1 Large bowl
- 1 Whisk
- 1 Rubber spatula
- 1 Food processor or resealable plastic bag and rolling pin
- 8 Clear plastic cups
- 1 2-cup measuring cup
- 1 Spoon for layering
Ingredients
- 3.9 oz instant chocolate pudding mix
- 2 cups cold milk
- 8 oz container whipped topping, thawed
- 14.3 oz chocolate sandwich cookies
- gummy worms
- candy pumpkins
- Milano cookies
- black decorating gel
- green food coloring (optional)
Instructions
- To begin creating your spooky dessert, you'll need to whisk the instant chocolate pudding mix with cold milk. Grab a large bowl and pour in the contents of your pudding mix packet. Measure out two cups of cold milk and add it to the bowl.Now, it's time to put some elbow grease into it! Whisk vigorously for about two minutes, making sure to break up any clumps that might form. You're aiming for a smooth, consistent texture throughout.Once you've whisked for two minutes, set your timer for five minutes and let the mixture rest. This waiting period allows the pudding to set properly, giving you that perfect creamy consistency.While you wait, why not prepare your cookie "dirt"? After the five minutes are up, you'll notice your pudding has thickened nicely.Now comes the fun part – folding in the whipped topping! Gently incorporate it into your pudding, creating a light and airy mixture. This step adds volume and a delightful mousse-like texture to your dirt cups. Ready to layer?
- After letting the pudding set, it's time to incorporate the whipped topping. Grab your container of thawed whipped topping and gently fold it into the pudding mixture.Why fold instead of stir? Folding preserves the air bubbles in the whipped topping, resulting in a lighter, fluffier texture.To fold properly, use a rubber spatula to cut through the center of the pudding mixture. Then, lift and turn the spatula over, bringing the bottom mixture to the top. Rotate the bowl as you go, repeating this motion until the whipped topping is fully incorporated.Don't overmix! You want to maintain that airy consistency.As you fold, you'll notice the pudding mixture becoming lighter in color and texture. This is exactly what you're aiming for. The whipped topping adds a creamy, mousse-like quality to your dirt cups, making them even more irresistible.Once you've achieved a uniform mixture with no streaks of white, you're done. Your pudding base is now ready for the next step in creating your spooky graveyard scene. Excited to see it all come together?
- Now it's time to create the "dirt" for your spooky graveyard scene. Grab your package of chocolate sandwich cookies and get ready to transform them into a crumbly, soil-like mixture.You've got two options for crushing these cookies: the quick and easy food processor method or the more hands-on bag-and-rolling-pin technique.If you're using a food processor, simply toss the cookies in and pulse until you've got a fine, consistent crumb.Don't have a food processor? No problem! Place the cookies in a sturdy, resealable plastic bag and seal it, removing as much air as possible.Now, channel your inner baker-meets-construction-worker and use a rolling pin to crush those cookies into oblivion. Roll, pound, and crush until you've achieved that perfect dirt-like consistency.Want to add some texture? Leave a few larger chunks for a more realistic look.
- The next step in creating your Graveyard Dirt Cups is layering the pudding mixture and crushed cookies. Grab your clear plastic cups and start with a thin layer of crushed cookies at the bottom. This will form the base of your "graveyard soil."Next, spoon in a generous layer of the chocolate pudding mixture, making sure it's evenly spread.Now, here's where you can get creative. How many layers do you want in your dirt cups? For a more visually appealing effect, aim for at least three alternating layers.As you add each layer, think about the texture you're creating. Are you going for a smooth, even look, or do you prefer a more rugged, natural appearance? Remember, these layers will be visible through the clear cup, so take your time to make them look just right.Finish with a top layer of crushed cookies to complete the "dirt" effect. Have you considered adding a slight slope to this final layer? It'll give your graveyard a more realistic, uneven ground appearance.Ready to move on to the fun part – decorating?
- Every Graveyard Dirt Cup deserves some spooky decorations to bring it to life (or death). Now's your chance to let your creativity shine!Start by carefully placing gummy worms so they're peeking out of the "dirt." Doesn't that add a delightfully creepy touch?Next, nestle a few candy pumpkins on top to create a miniature pumpkin patch.For the pièce de résistance, you'll craft tombstones using Milano cookies. Write "RIP" on each cookie with black decorating gel, then gently insert them into the cups.Want to add an extra layer of realism? Mix a few drops of green food coloring into some whipped topping and dot it around the base of the tombstones to mimic moss.

Nutrition
Serving: 1gCalories: 355kcalCarbohydrates: 55gProtein: 4gFat: 13gSaturated Fat: 5gPolyunsaturated Fat: 2gMonounsaturated Fat: 5gTrans Fat: 0.03gCholesterol: 4mgSodium: 428mgPotassium: 165mgFiber: 2gSugar: 35gVitamin A: 61IUCalcium: 60mgIron: 6mg
Swaps And Substitutions
Flexibility is key when making Graveyard Dirt Cups, as you can easily swap out ingredients to suit dietary needs or preferences. For a gluten-free version, replace the chocolate sandwich cookies with gluten-free alternatives.
If you’re looking for a healthier option, try using sugar-free pudding mix and low-fat whipped topping. Vegan? No problem! Substitute dairy-free pudding and plant-based whipped cream.
Don’t be afraid to get creative with your decorations. While gummy worms and candy pumpkins are classic choices, you can experiment with different candies or even edible decorations made from fondant.
Remember, the goal is to create a spooky and delicious treat that’s uniquely yours. Here are four ways to make your Graveyard Dirt Cups stand out:
- Use crushed black sesame seeds for a more realistic “dirt” appearance
- Add a layer of green-tinted coconut flakes to mimic grass
- Create mini ghosts using marshmallows and black icing
- Incorporate seasonal flavors like pumpkin spice or caramel apple
Serving Suggestions And Meal Pairings
Serving Graveyard Dirt Cups is all about presentation and timing. You’ll want to make these spooky treats the centerpiece of your Halloween spread. Consider setting up a dedicated dessert table where guests can admire your creepy creations before digging in.
Remember, these cups are best served chilled, so keep them refrigerated until just before you’re ready to serve.
When it comes to meal pairings, Graveyard Dirt Cups are versatile enough to complement a variety of Halloween-themed dishes. They’re perfect as a finale to a savory menu or as part of a dessert buffet.
To enhance the experience, try these serving suggestions:
- Dim the lights and use candles to create an eerie atmosphere.
- Play spooky sound effects to set the mood.
- Serve alongside warm apple cider for a comforting contrast.
- Offer mini wooden spoons for a rustic, graveyard-appropriate touch.
Don’t forget to encourage your guests to get creative with their dirt cup consumption. Will they dig for the gummy worms first, or savor the layers one by one?
The interactive nature of these treats makes them a memorable addition to any Halloween celebration.
Refrigerate for up to 3 Days
After you’ve served up these spooky treats, you might find yourself with leftovers. Don’t worry! Your Graveyard Dirt Cups can be refrigerated for up to 3 days, allowing you to enjoy them throughout the Halloween season.
To maintain their freshness and spooky appeal, follow these tips:
- Cover each cup tightly with plastic wrap or aluminum foil.
- Store them in the coldest part of your refrigerator, typically the back.
- Keep them away from strong-smelling foods to prevent flavor absorption.
- Remove any gummy worms or candy pumpkins before storing, and add fresh ones when serving.
You’ll notice that the texture might change slightly over time. The crushed cookies will soften, creating a more cohesive “dirt” texture. This can actually enhance the overall experience!
When you’re ready to serve the leftovers, give them a quick stir to redistribute the layers. Why not experiment with different toppings each day? You could add crushed candy corn or sprinkle on some Halloween-themed sprinkles for variety.
Frequently Asked Questions
Addressing common queries about Graveyard Dirt Cups can help you create the perfect spooky treat. You’ll find that these questions often revolve around ingredients, preparation, and storage.
Can you substitute the chocolate pudding for another flavor? Absolutely! Vanilla or butterscotch work well, though they’ll change the “dirt” appearance.
What if you don’t have clear cups? No worries! Small mason jars or even disposable party cups will do the trick.
When it comes to making these creepy desserts, remember:
- The crunchier the cookie crumbs, the more realistic your “dirt” will look.
- Don’t be afraid to get creative with your toppings – the spookier, the better!
- Layering is key to achieving that graveyard effect – take your time!
- The longer they chill, the more the flavors will meld together.
Wondering about make-ahead options? You can prepare these cups up to three days in advance, but add the decorations just before serving to maintain their freshness.
Final Thoughts
With your questions answered, let’s wrap up our journey through the world of Graveyard Dirt Cups.
You’ve now got all the tools you need to create these spooky, delicious treats that’ll be the talk of your Halloween gathering.
Remember, the beauty of this recipe lies in its versatility. Don’t be afraid to experiment with different toppings, cookie varieties, or even pudding flavors to make it your own.
As you prepare your Graveyard Dirt Cups, think about the joy they’ll bring to your guests.
Will you see their eyes light up at the sight of the gummy worms peeking out from the “dirt”?
Can you imagine the smiles as they dig into their personal graveyard scenes?
That’s the magic of these desserts – they’re not just tasty, they’re an experience.